For the complete documentation index, see llms.txt. This page is also available as Markdown.

Migrate from Exodus

We know migrating to a new wallet can be a stressful process, so we've worked hard to make this migration as seamless as possible for our users. In the following guide, we've broken down the migration process from Exodus wallet → Cake Wallet into an easy-to-follow guide, including screenshots of every step of the process.

Getting started

Now let's get you started migrating over! Migrating from Exodus → Cake only requires three basic steps, all of which are outlined in detail throughout the guide:

  • Install Cake Wallet

  • Create a new Monero wallet

  • Send all of your Monero in Exodus wallet to the newly created Monero wallet in Cake

Now for those who specifically want to keep their transaction history or have another reason to re-use their existing Exodus 25-word Monero seed, feel free to jump down to the relevant section:

Advanced method: Exporting an existing wallet to Cake

Not so daunting now, is it? Let's get started.

We're here to help!

If at any point you get nervous or need help, please don't hesitate to reach out to our team in-app or via support@cakewallet.com, where our incredible support staff are waiting to help ease the migration process for you.

Installing Cake Wallet

Cake Wallet is available on Android, iOS, macOS, and Linux. Windows desktop builds are currently paused while the desktop app is rebuilt.

For the best compatibility and easiest setup we recommend using the mobile version of Cake Wallet to get started, and then explore our desktop apps down the line.

Download Cake Wallet for your platform from the official download page.

The easiest path is to simply create a new Monero wallet in Cake Wallet and transfer your funds over with a simple transaction. Not only does this allow you to skip the lengthy synchronization process of restoring an older Monero wallet, but it also lets you get all of the benefits of a new seed format in Monero called "Polyseed."

This newer seed format is easier to backup and restore (only 16 words, instead of 25), encodes the restore height directly into the seed phrase, and has several other security features that ensure your Monero stays safer than ever.

Creating a new Monero wallet on Cake
1

Download and open Cake Wallet

  • Download Cake Wallet using the links above

  • Open Cake Wallet

2

Set a PIN

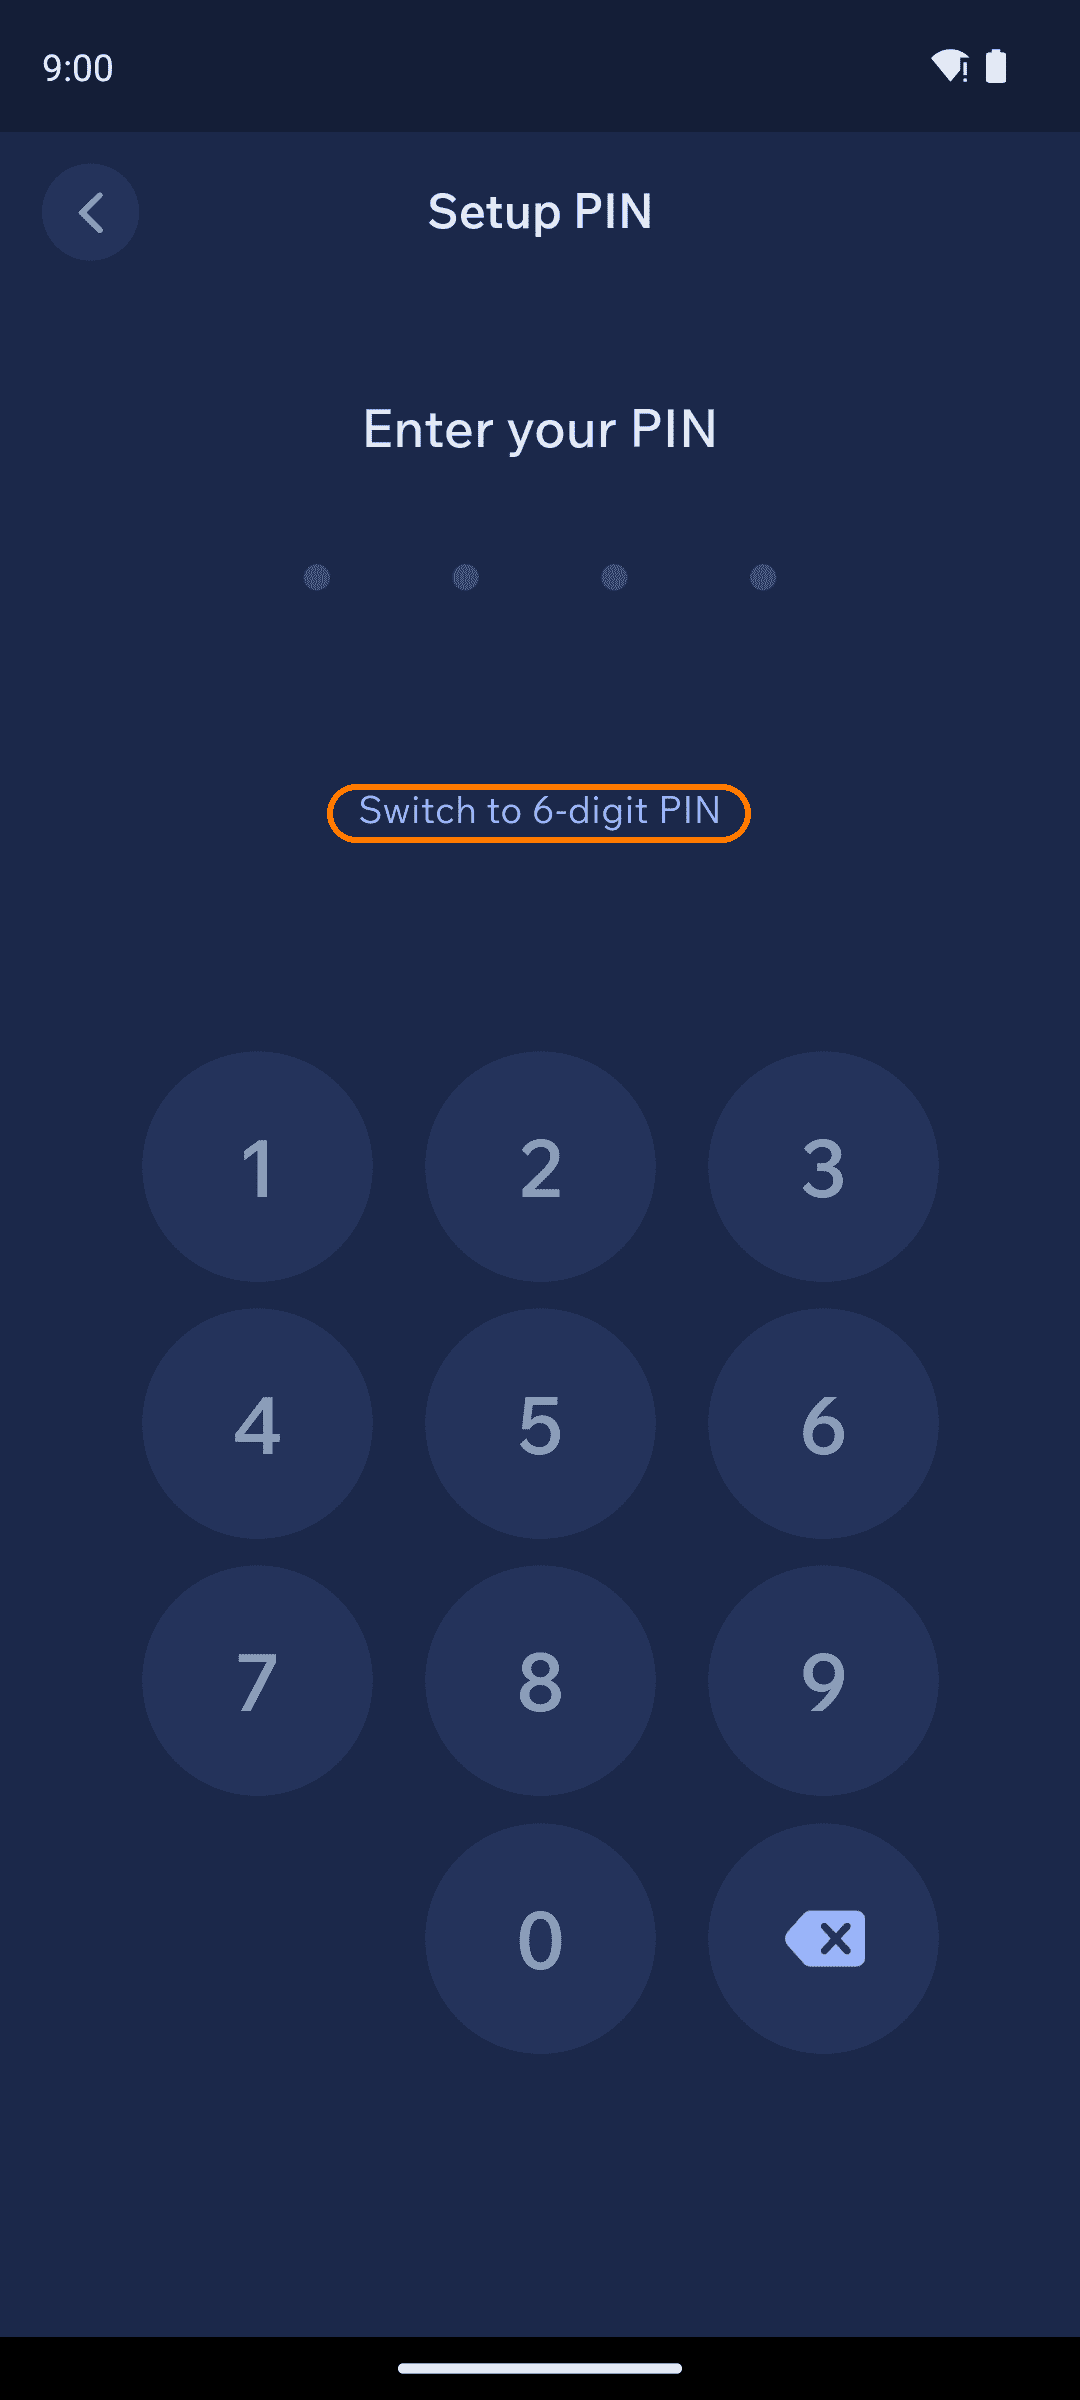
  • Tap Set a PIN and set a PIN for the app

Note: If you want to use a longer 6-digit PIN, simply tap Switch to 6-digit PIN

Set a PIN
3

Create a new wallet

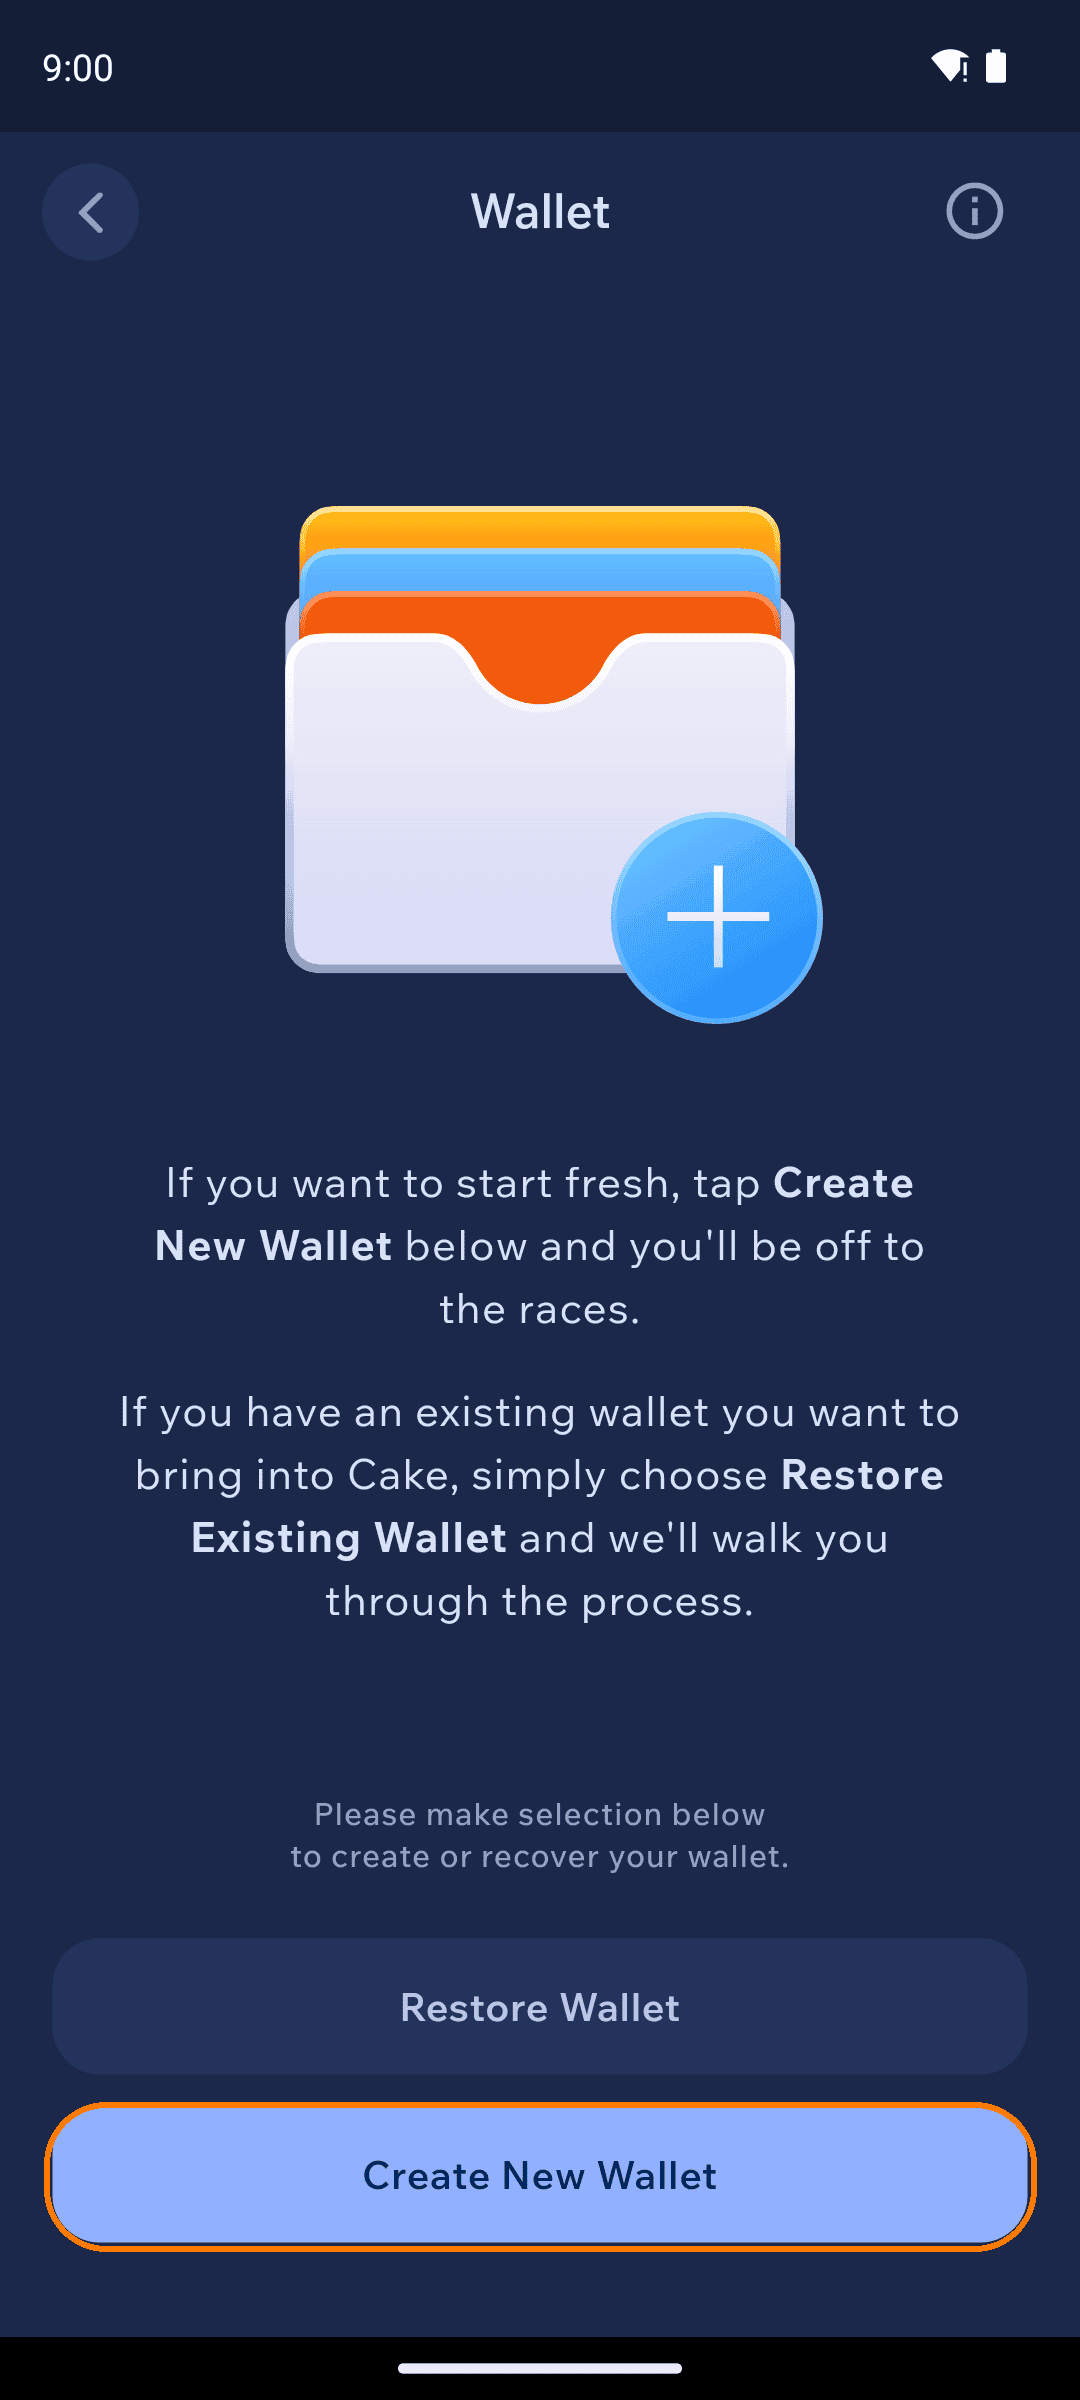
  • Tap Create New Wallet

Create a new wallet
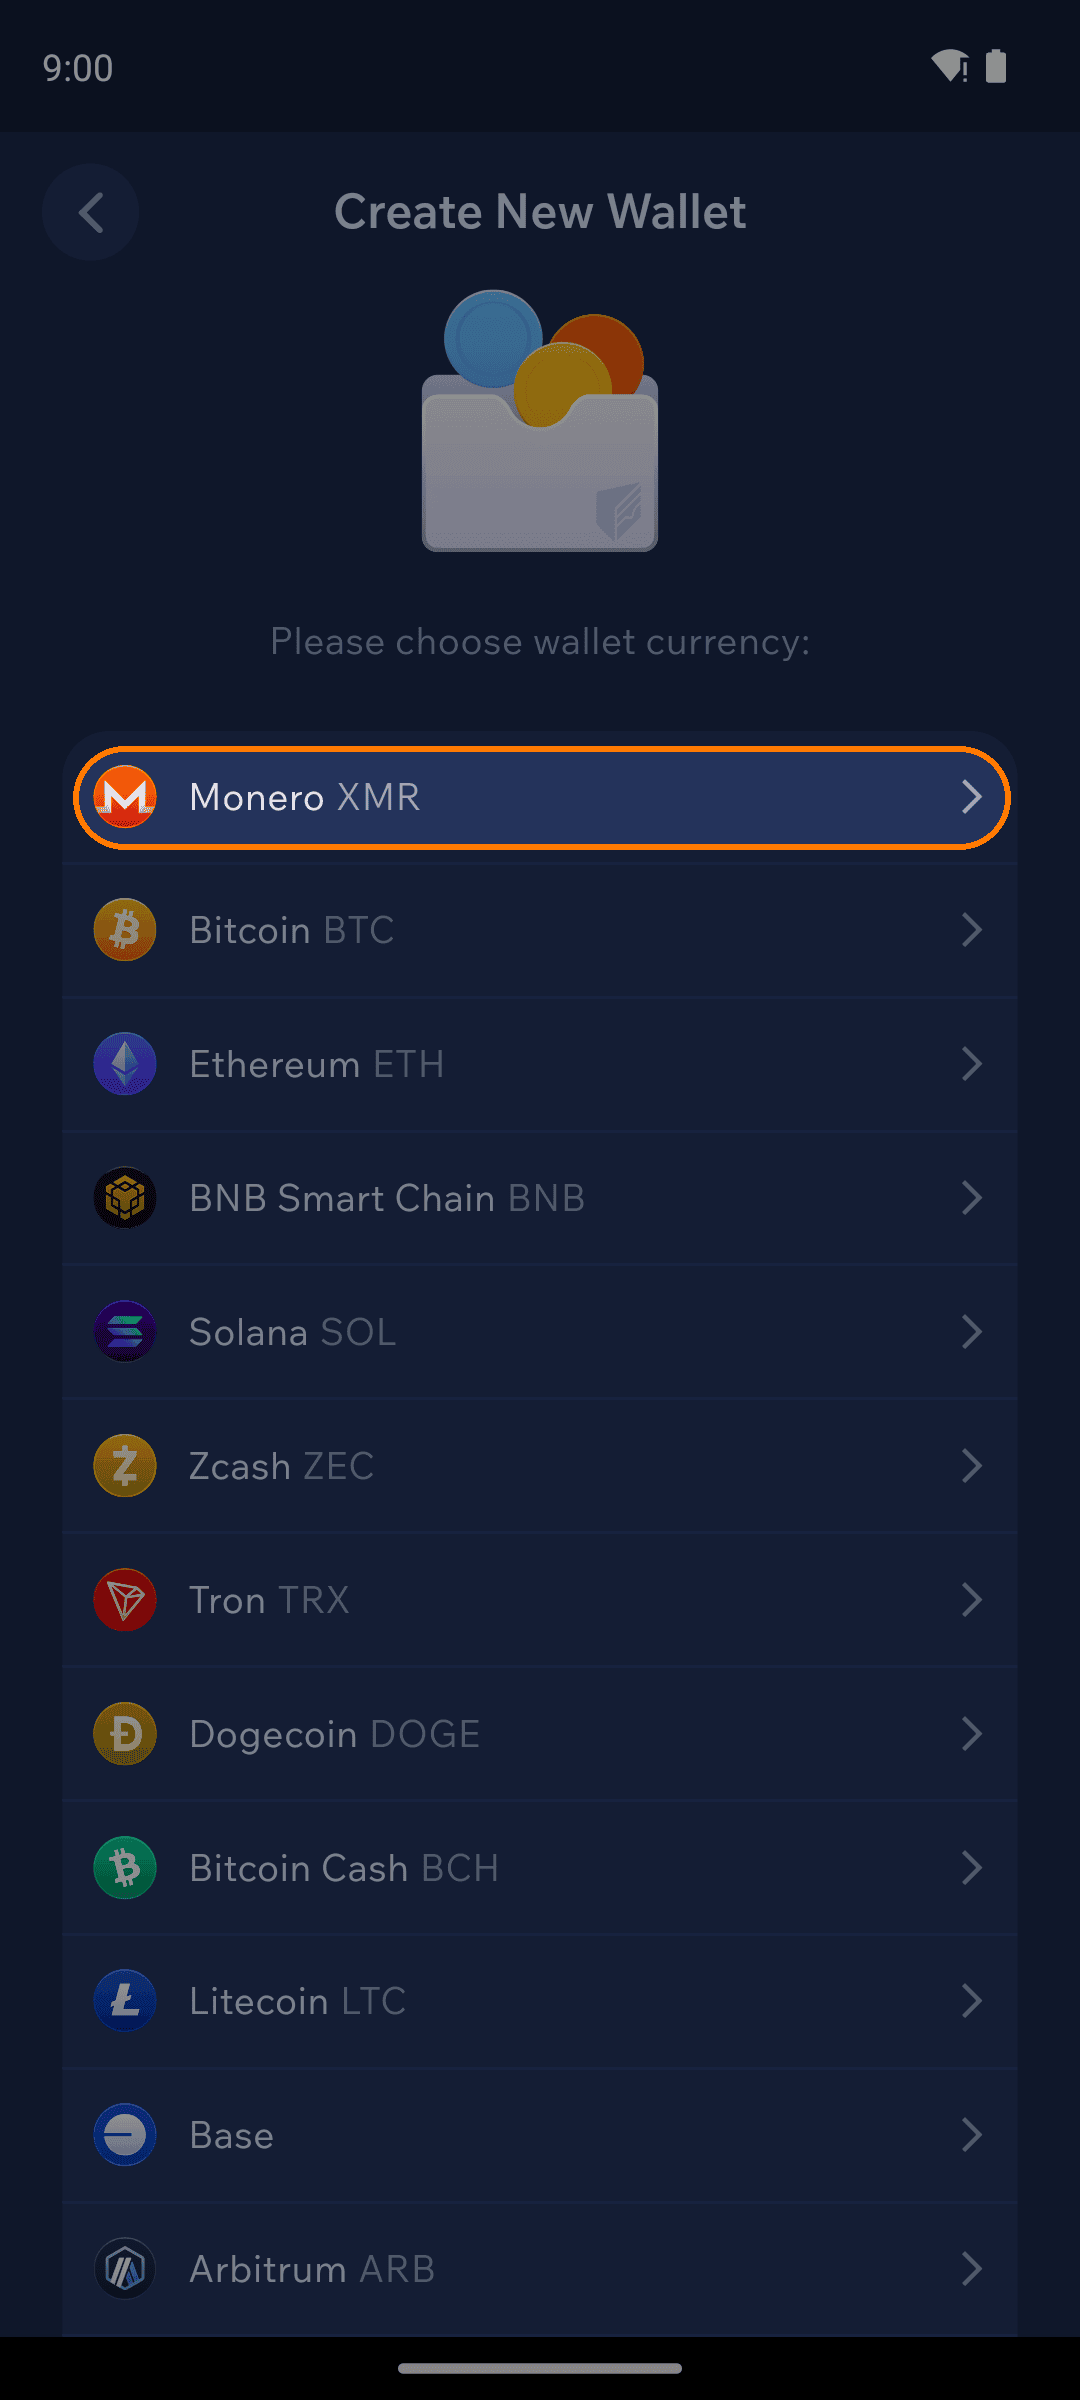
  • Select Monero from the list of currencies

Select Monero as the currency
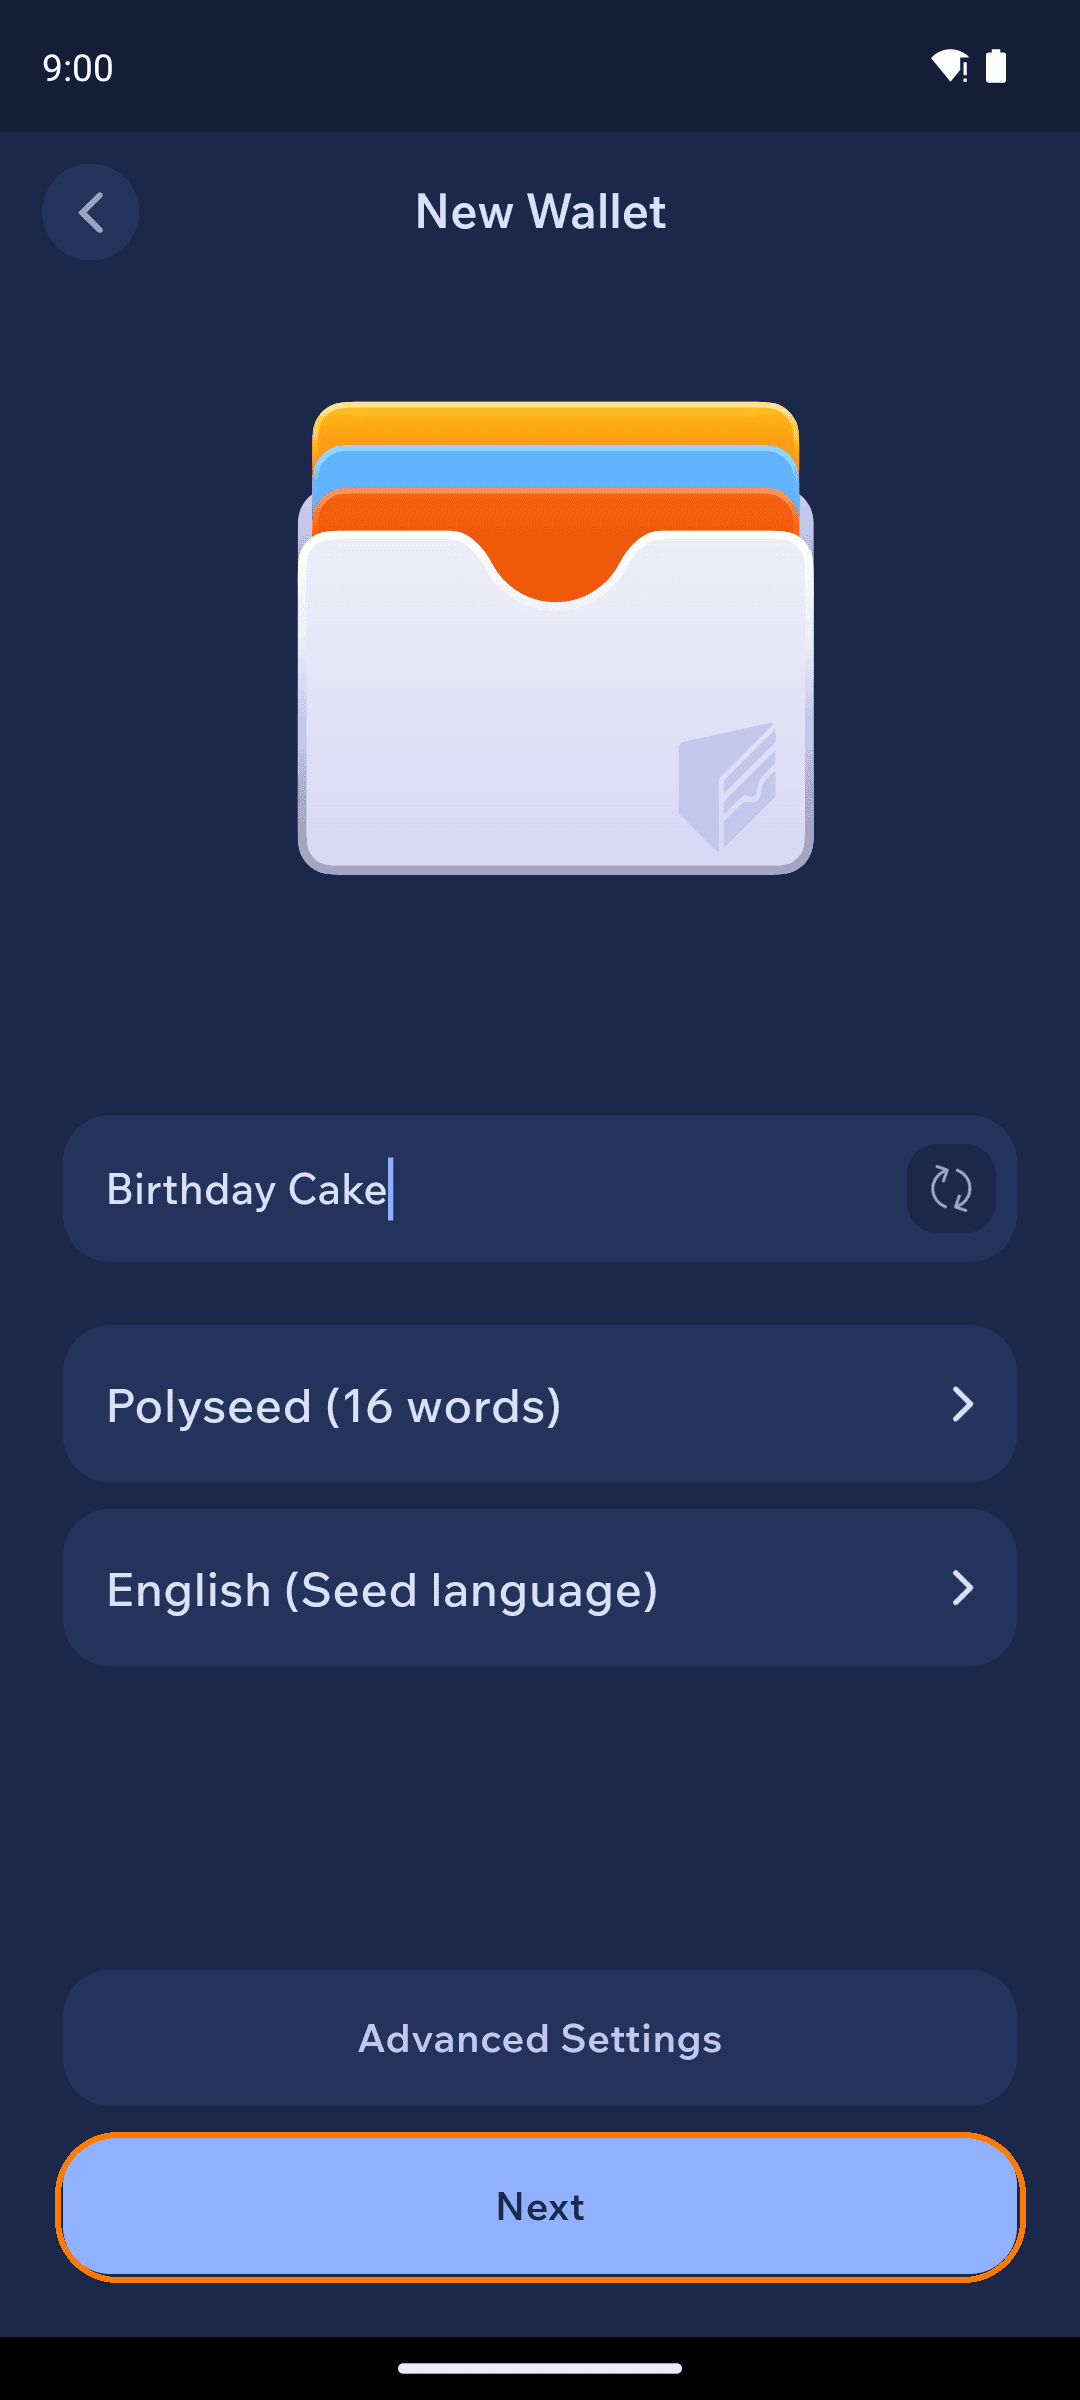
  • Enter a wallet name (or tap the 🔄 button to create a random name) and then tap Next

Name your wallet
4

Backup your seed

  • Follow the on-screen warnings about your seed phrase, then tap Verify Seed

  • Store your seed phrase in a safe place where you can import it into Cake Wallet in the next section. Recommended options:

    • Storing your seed in an end-to-end encrypted password manager like Bitwarden, Proton Pass, or iCloud Keychain

    • Writing it down and keeping it in a secure place

  • Verify your backup by tapping the correct seed words in the order prompted

5

Get your receive address

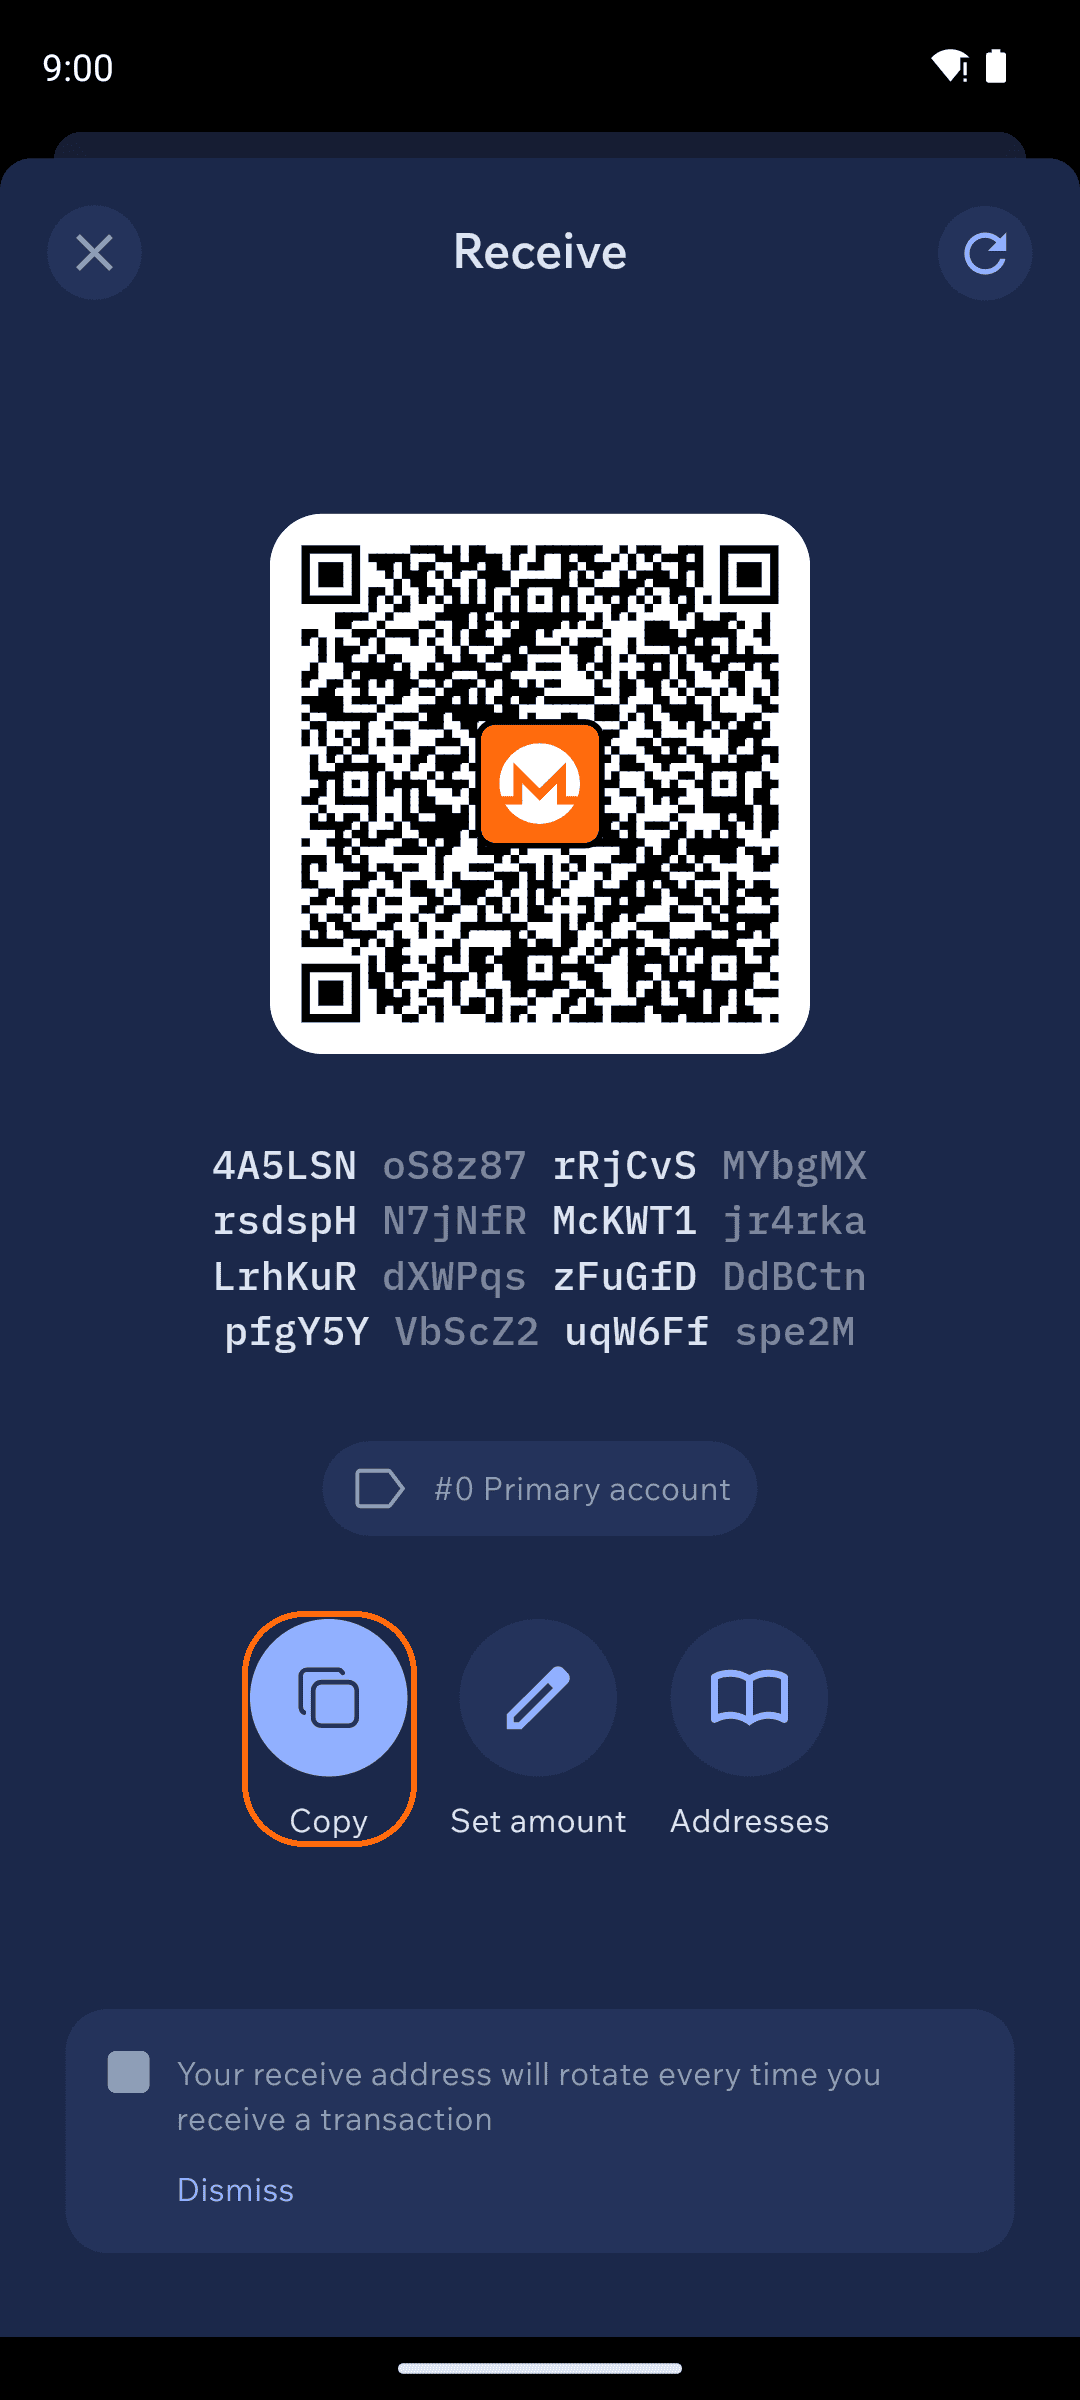
  • Tap Receive in the action row on the home screen (alongside Send and Swap) to display a QR code with a Monero receive address

Note: If necessary, you can easily copy or share the address by tapping the icon next to the address, then sending to yourself via a messaging app, email, etc.

Your Monero receive address

Send Monero balance from Exodus Mobile
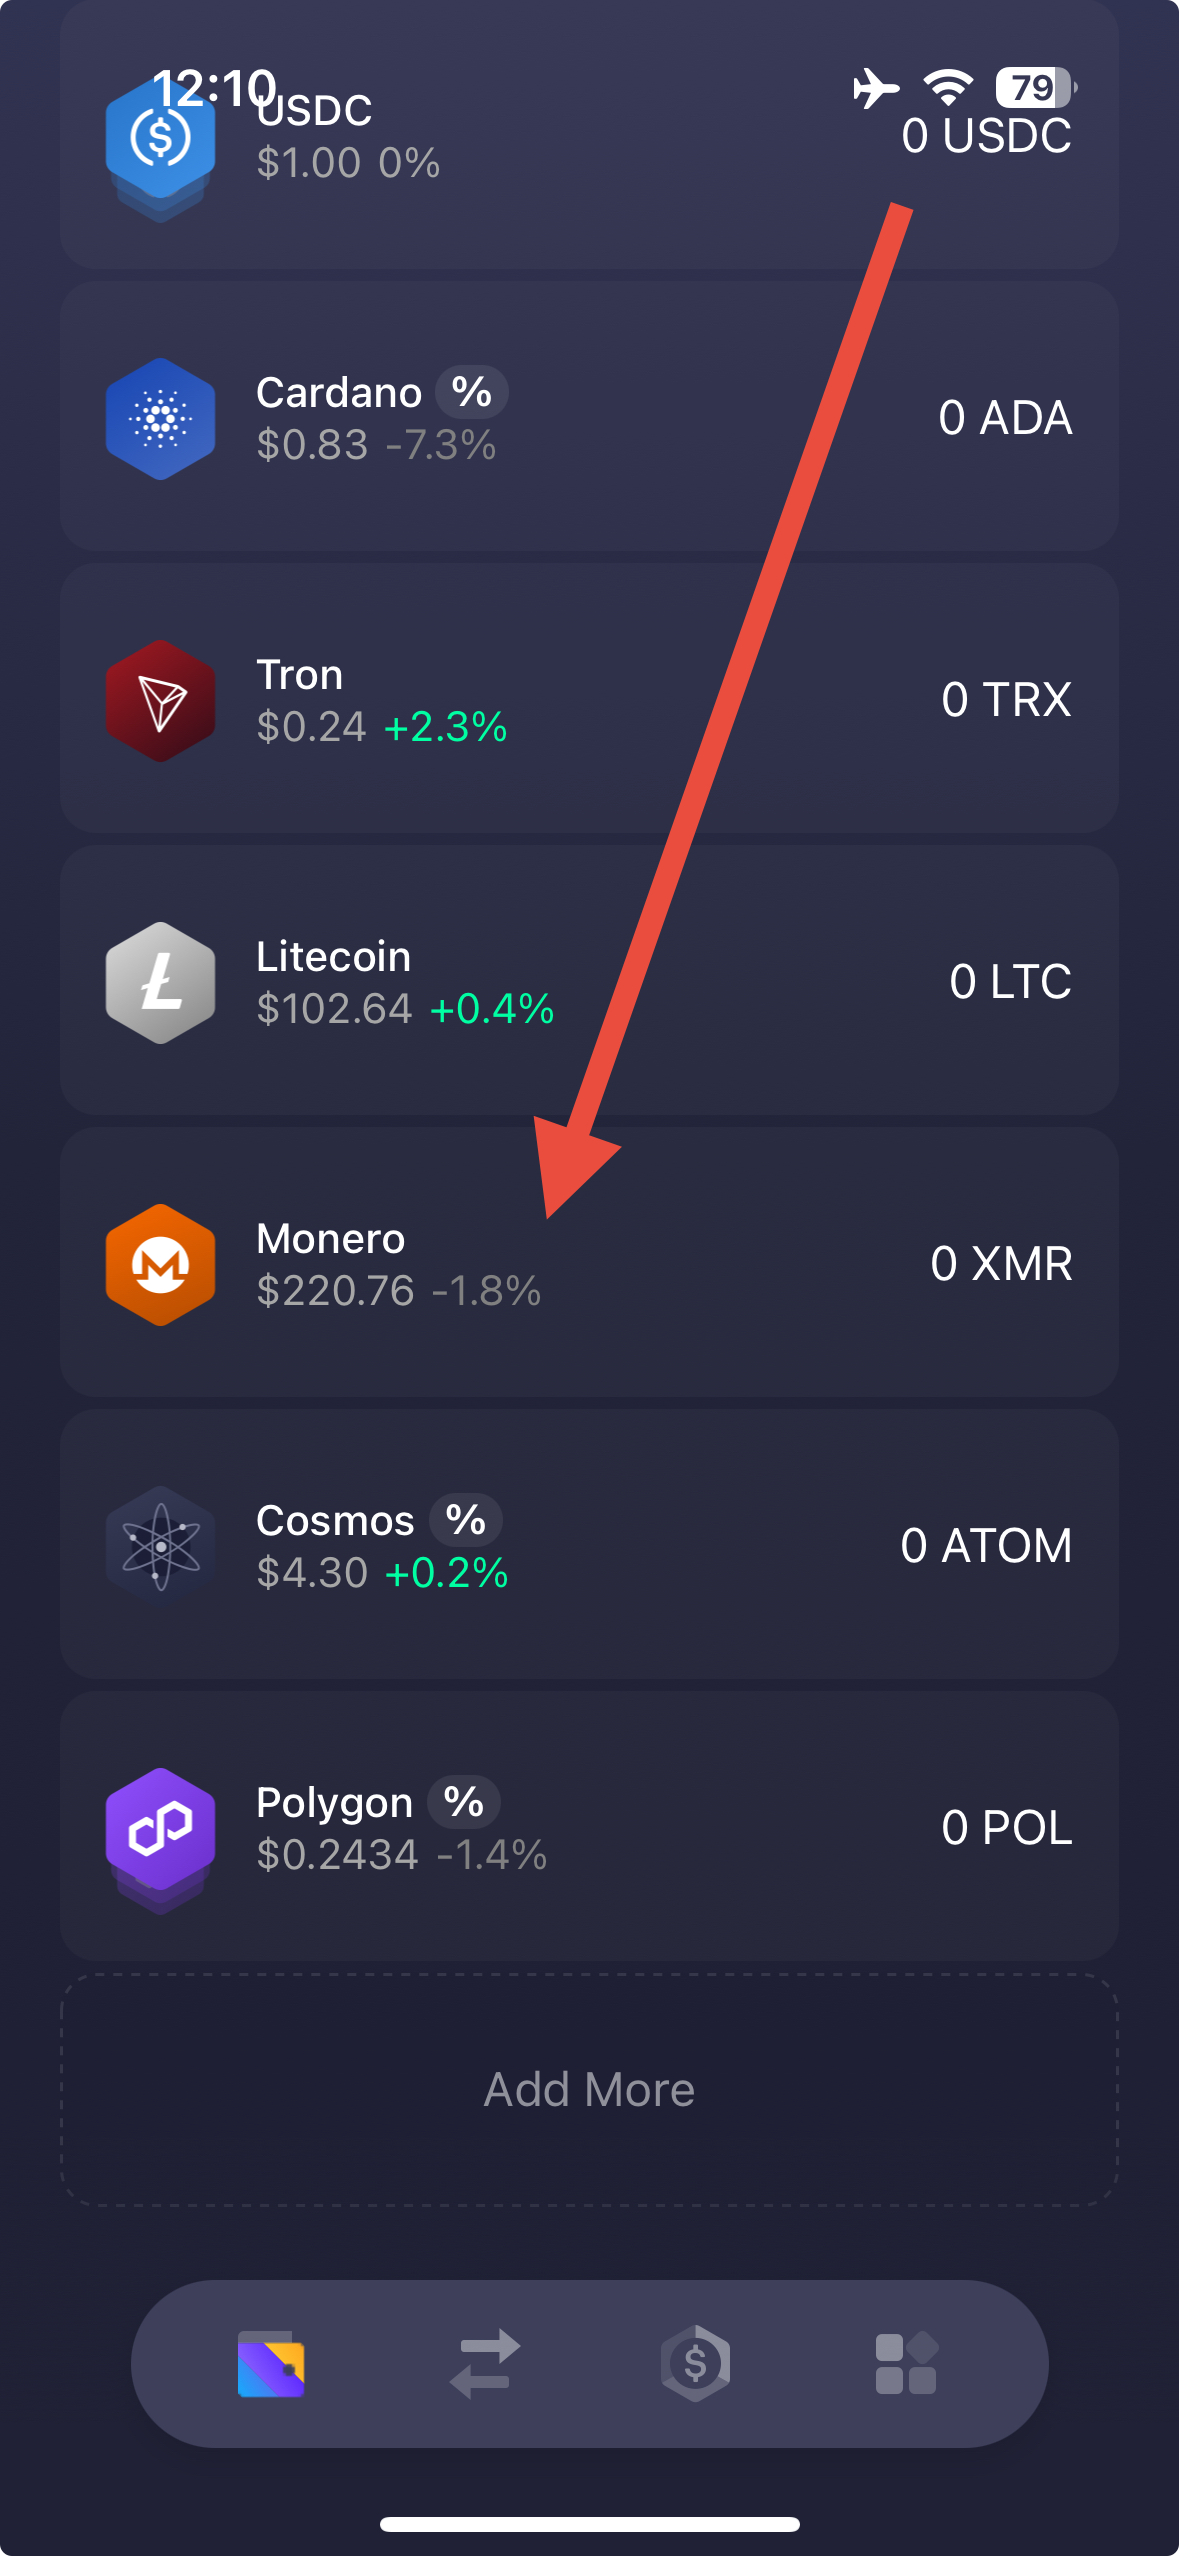
1

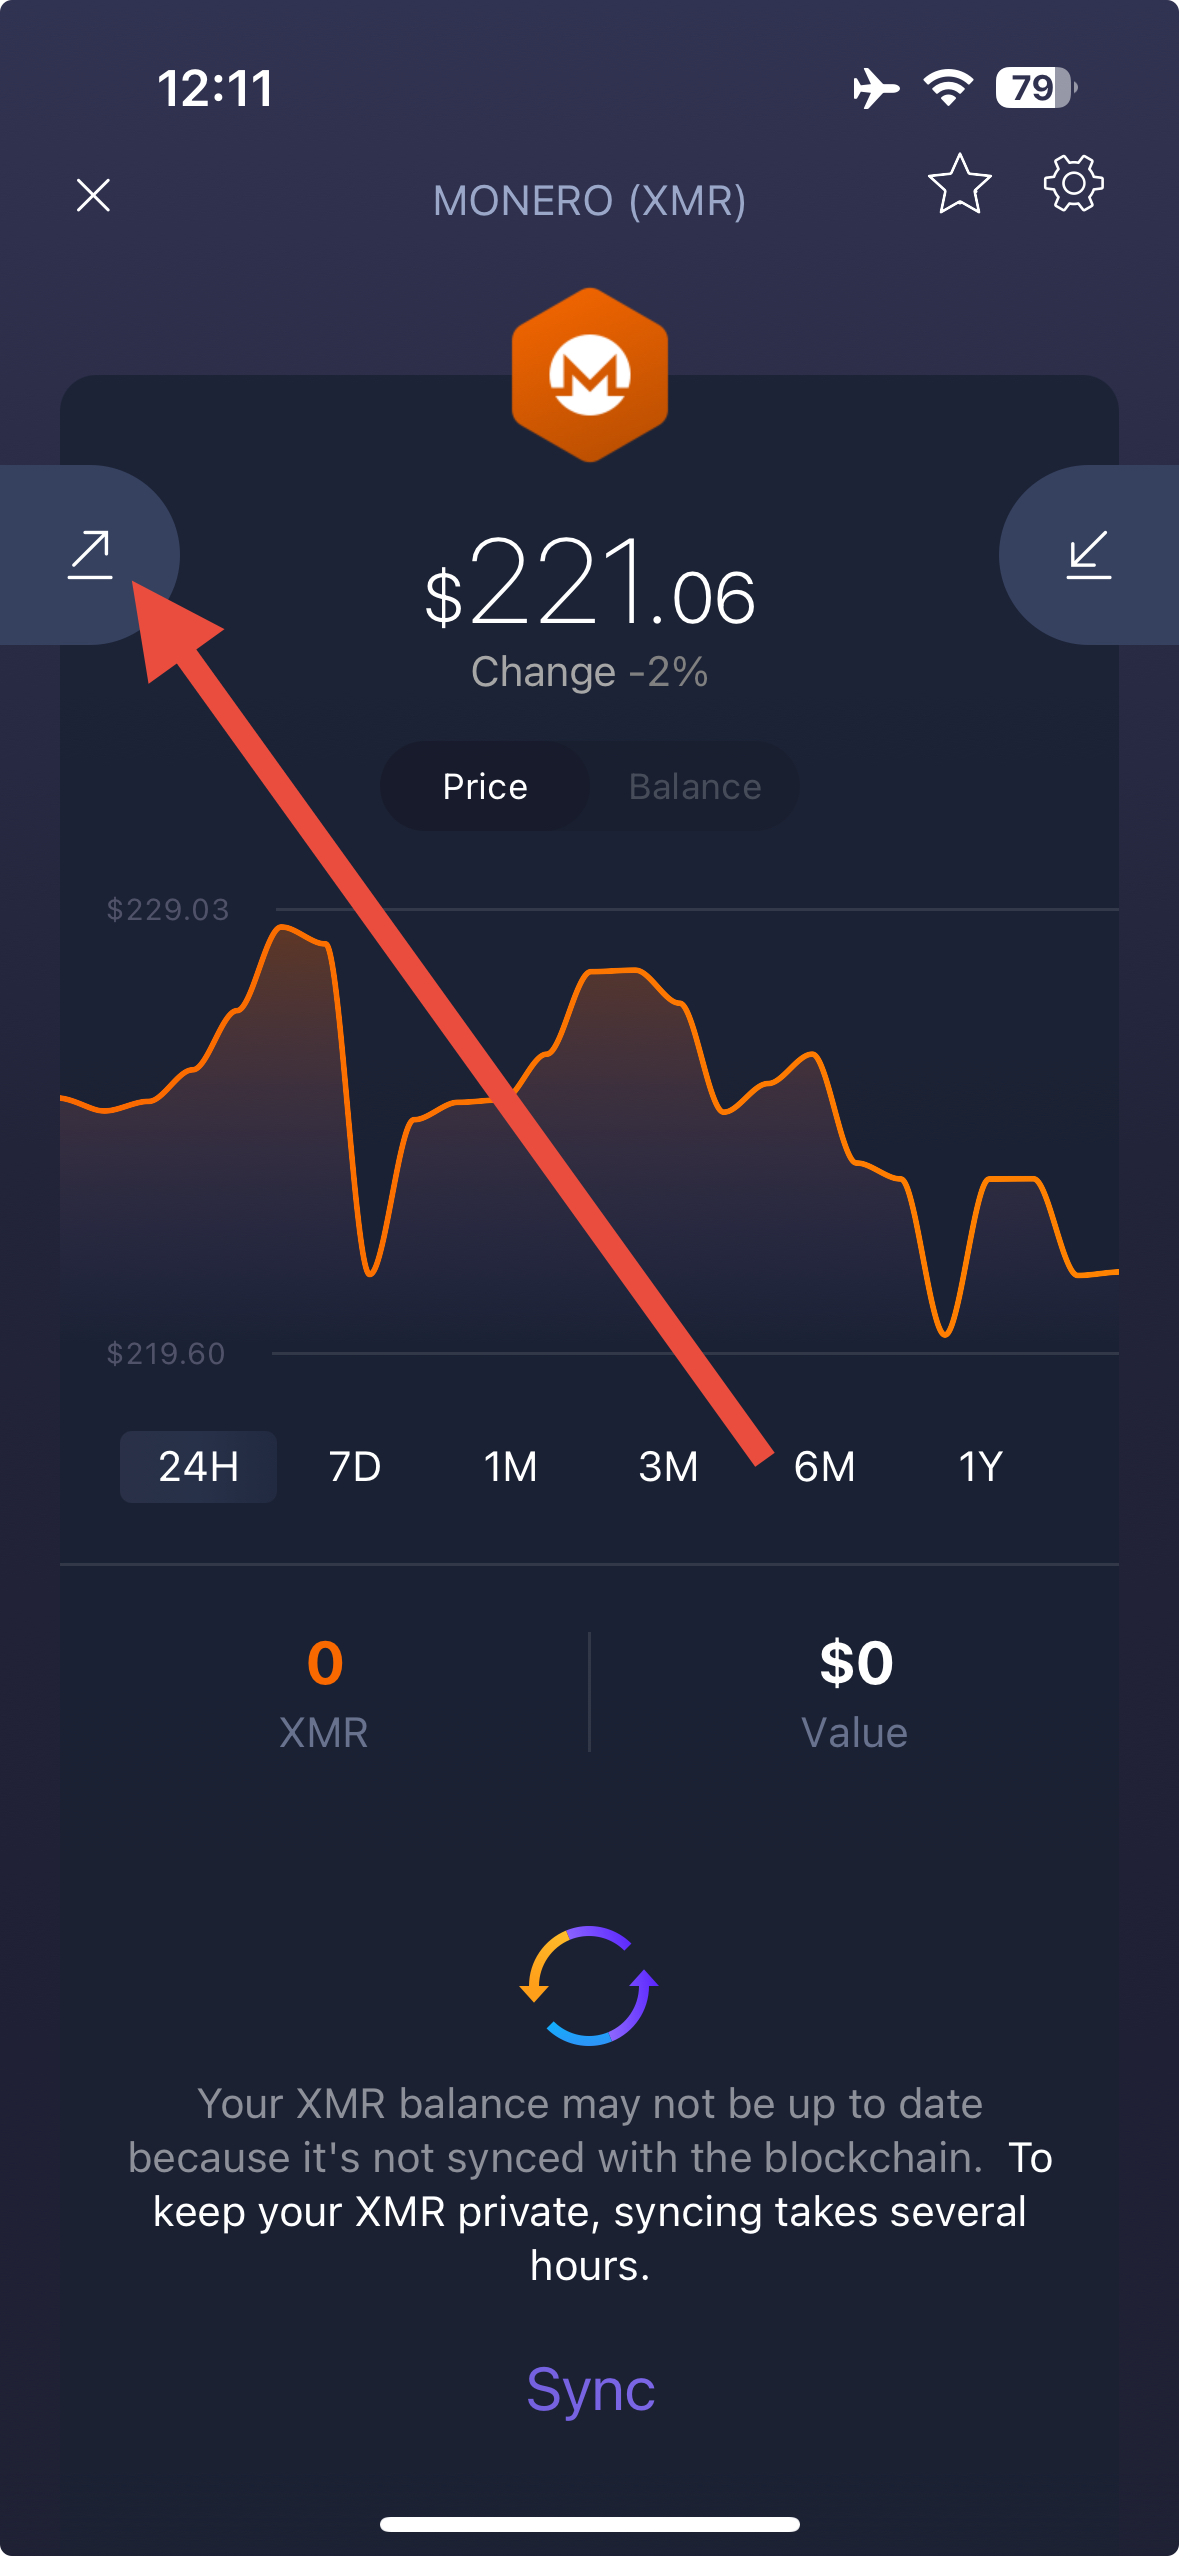
Open Monero in Exodus

  • On the home page of Exodus, scroll down and tap on Monero

Open Monero in Exodus
2

Start send flow

  • Tap the Send button at the top left

Tap Send in Exodus
3

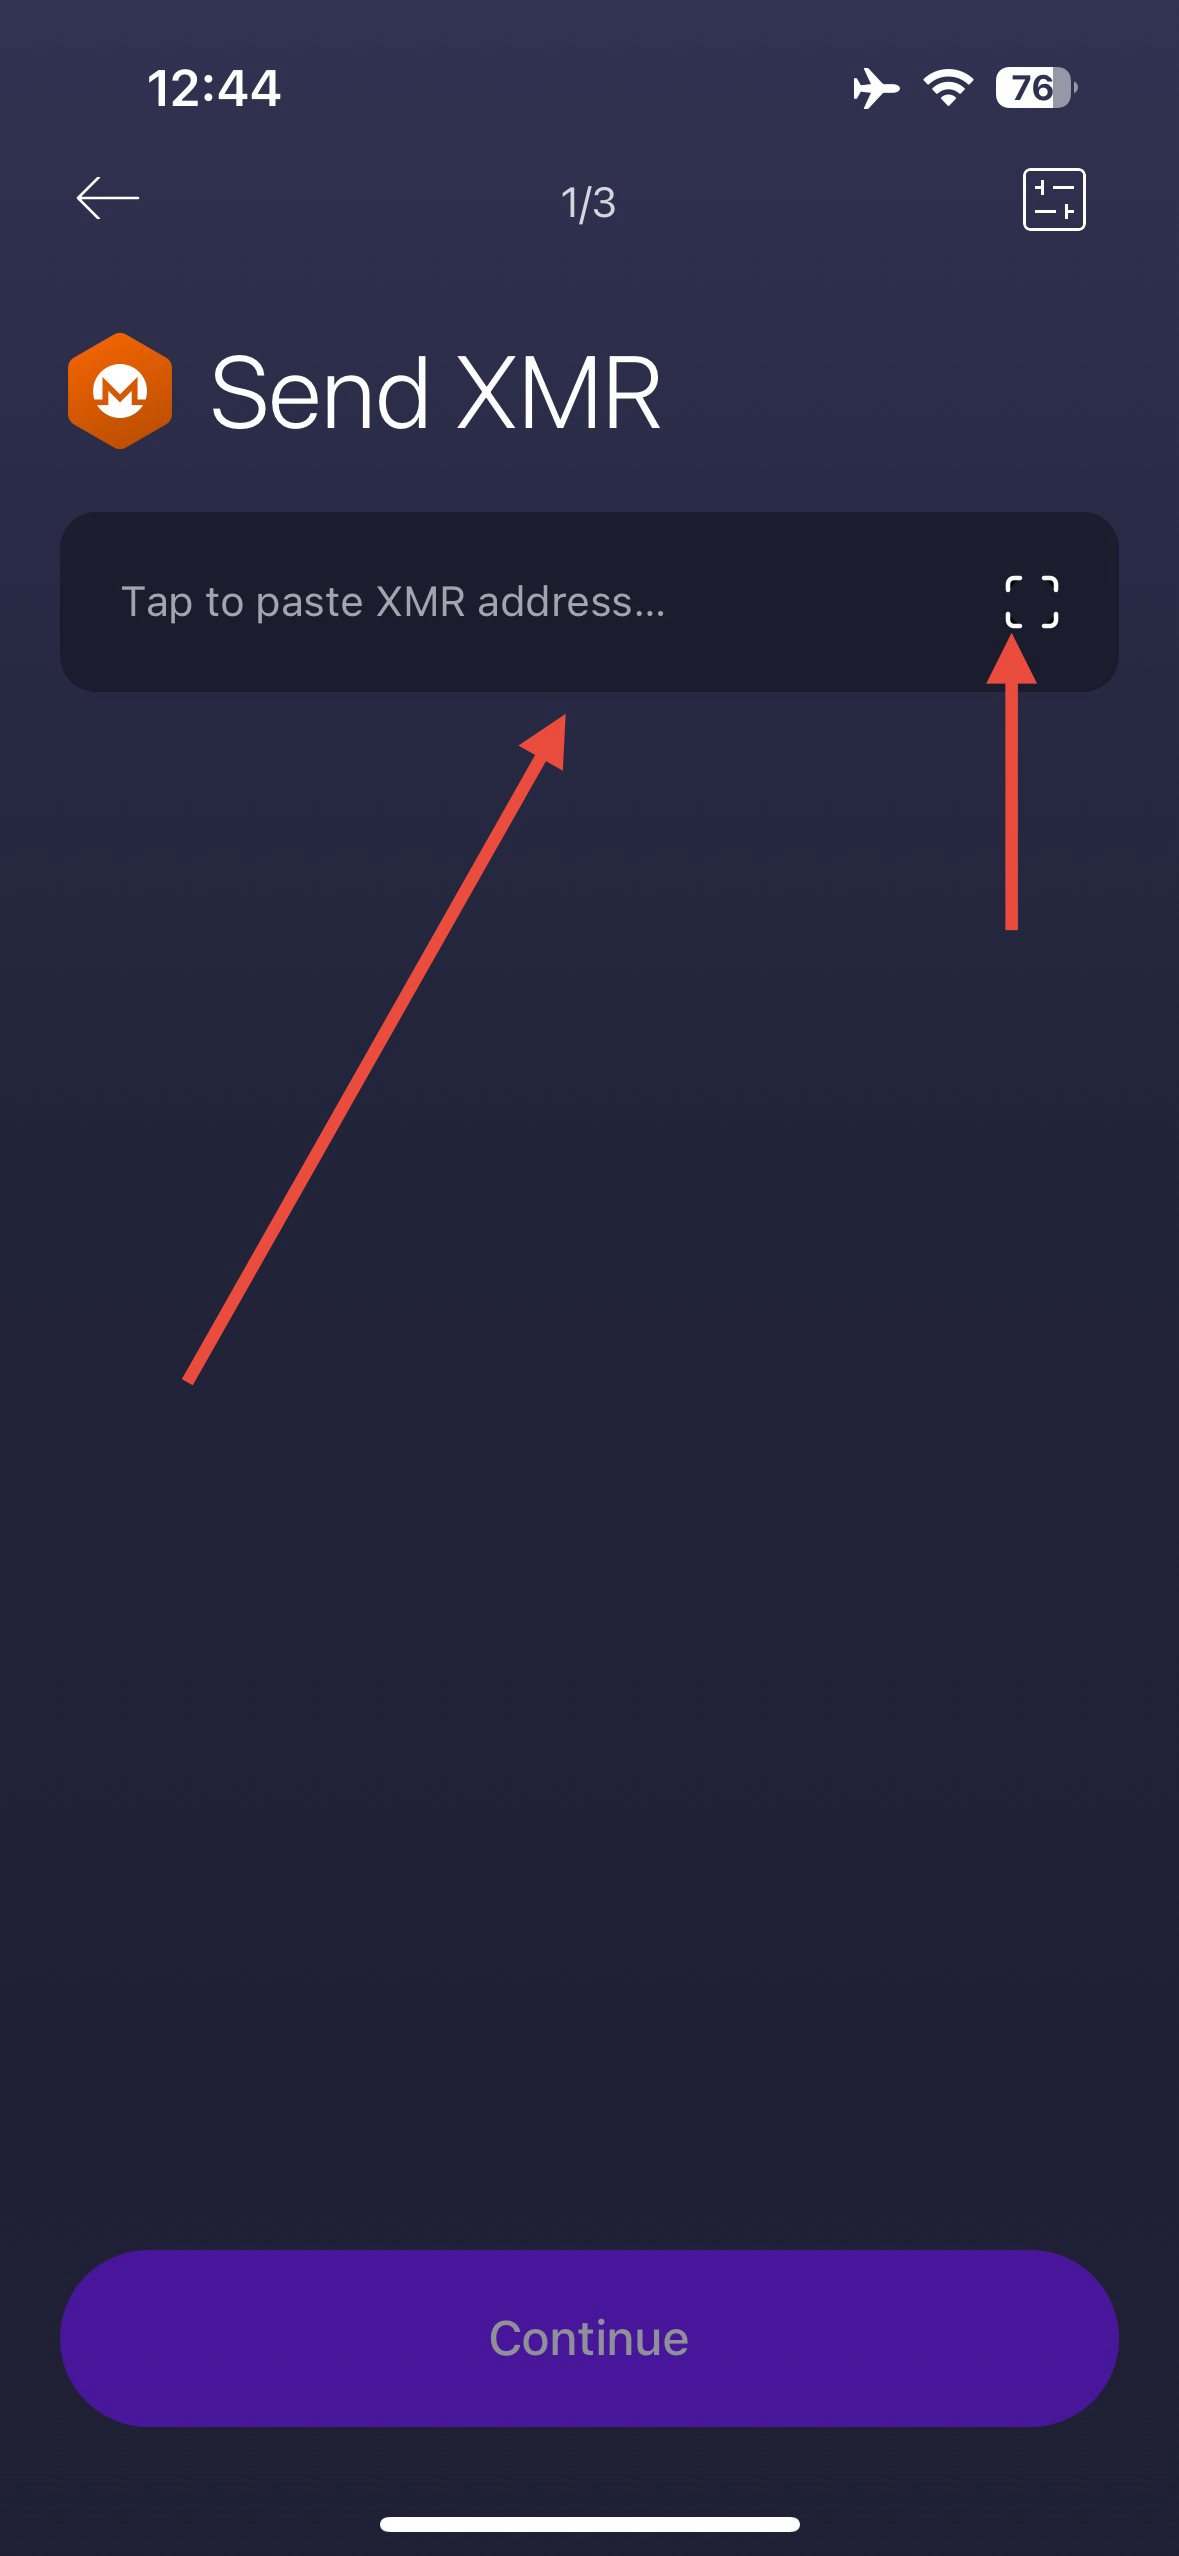
Enter recipient

  • Scan the QR code in Cake Wallet, or tap the address field to paste in the address, then tap Continue

Paste your Cake Wallet address
4

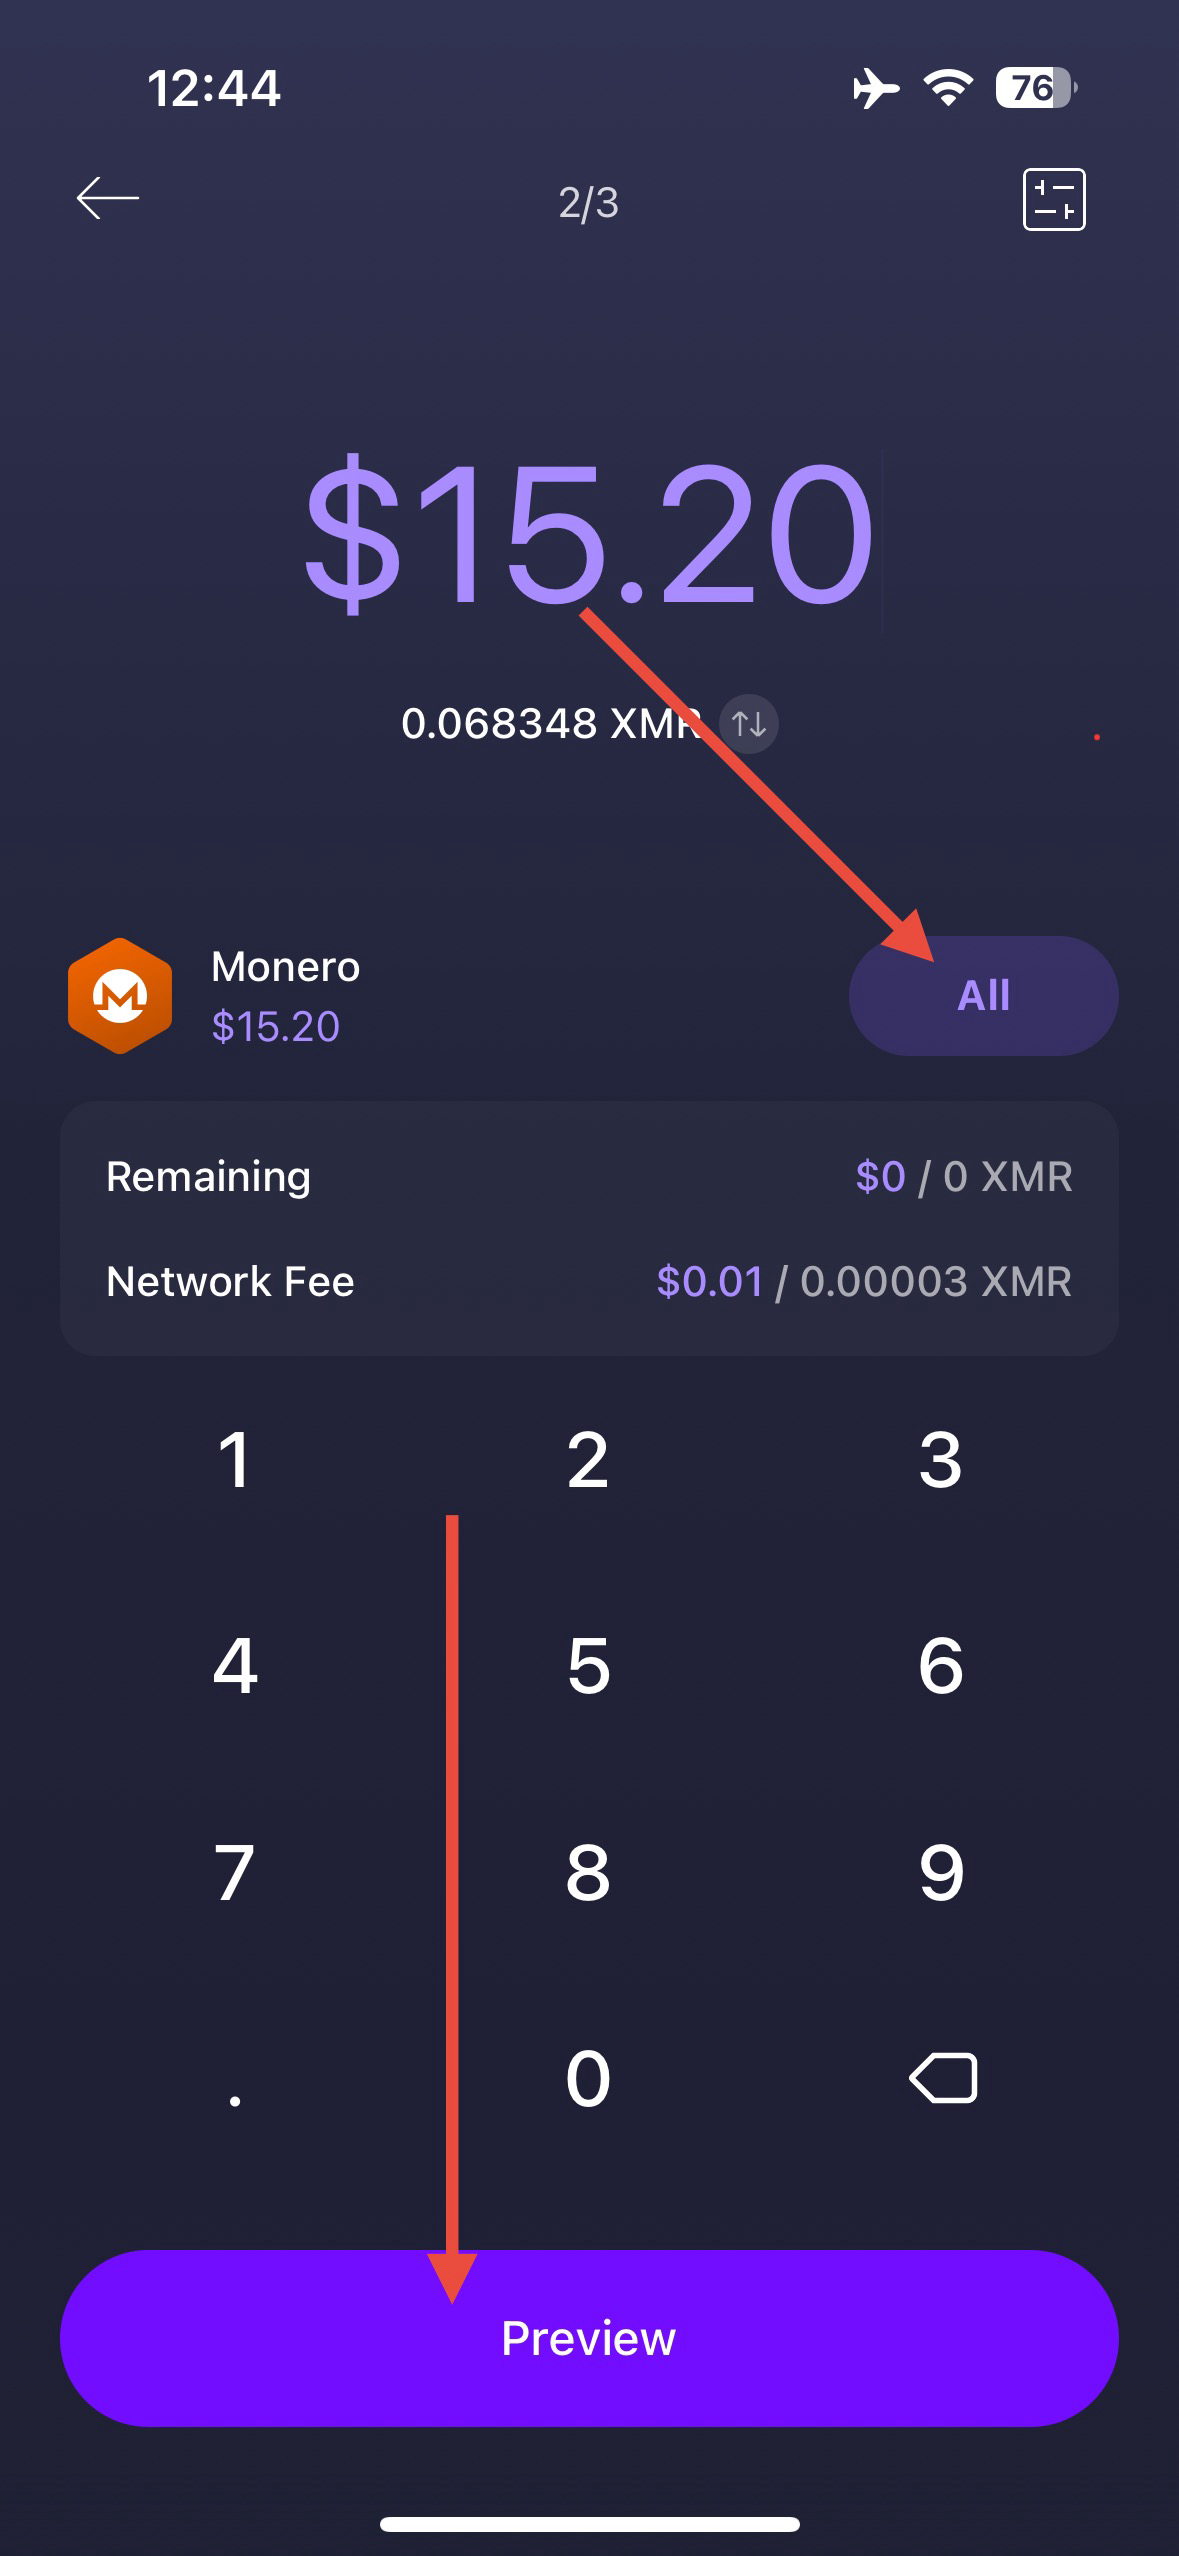
Send funds

  • Tap All to send the entirety of your Monero balance to your new Cake Wallet, then tap Preview

Feel free to send a smaller, test transaction to Cake Wallet to test if it helps you feel more comfortable before sending your entire wallet balance!

Send your full balance
  • Confirm the receiving address is correct on the preview screen, then Swipe to send

  • Once you have sent the funds, confirm they show up in your new Monero wallet in Cake

Send Monero balance from Exodus Desktop
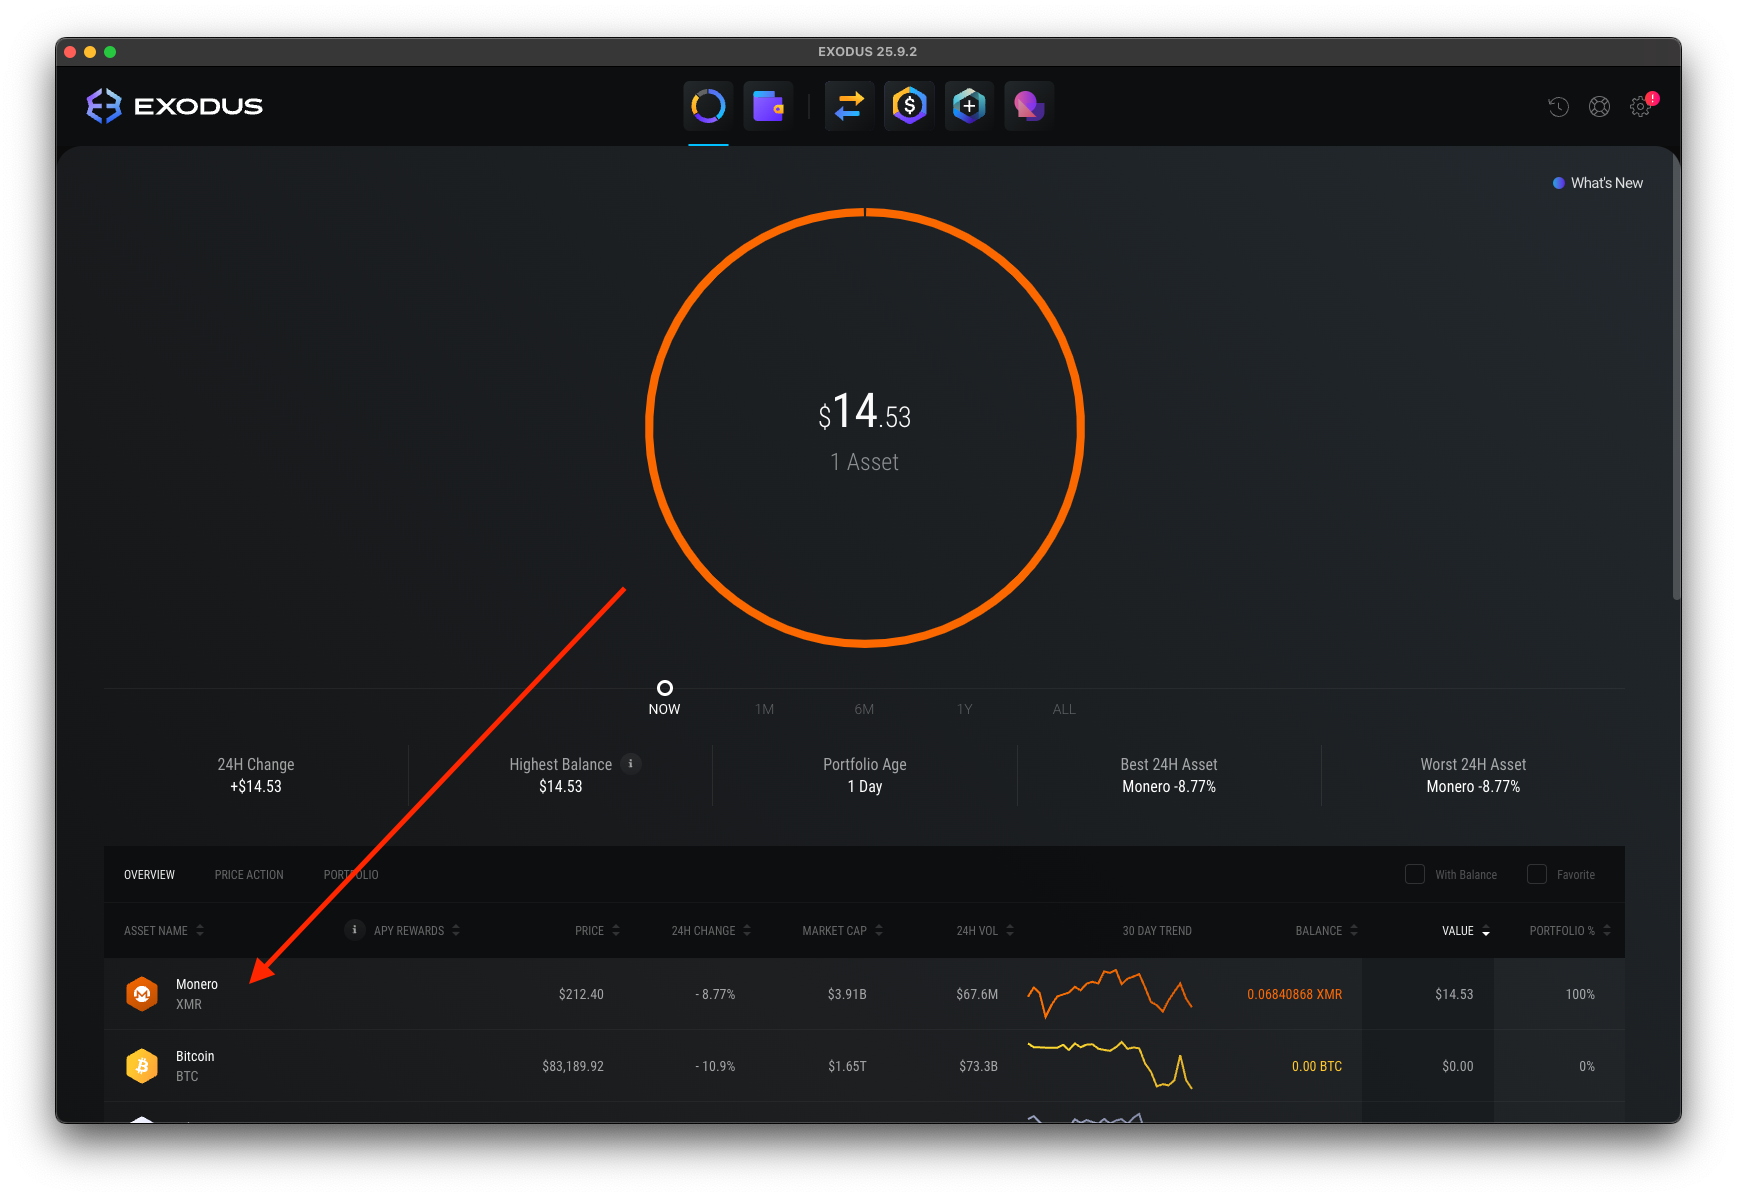
1

Open Exodus and Monero wallet

  • Open Exodus Wallet

  • From the portfolio screen, click to open the Monero wallet

Open the Monero wallet in Exodus
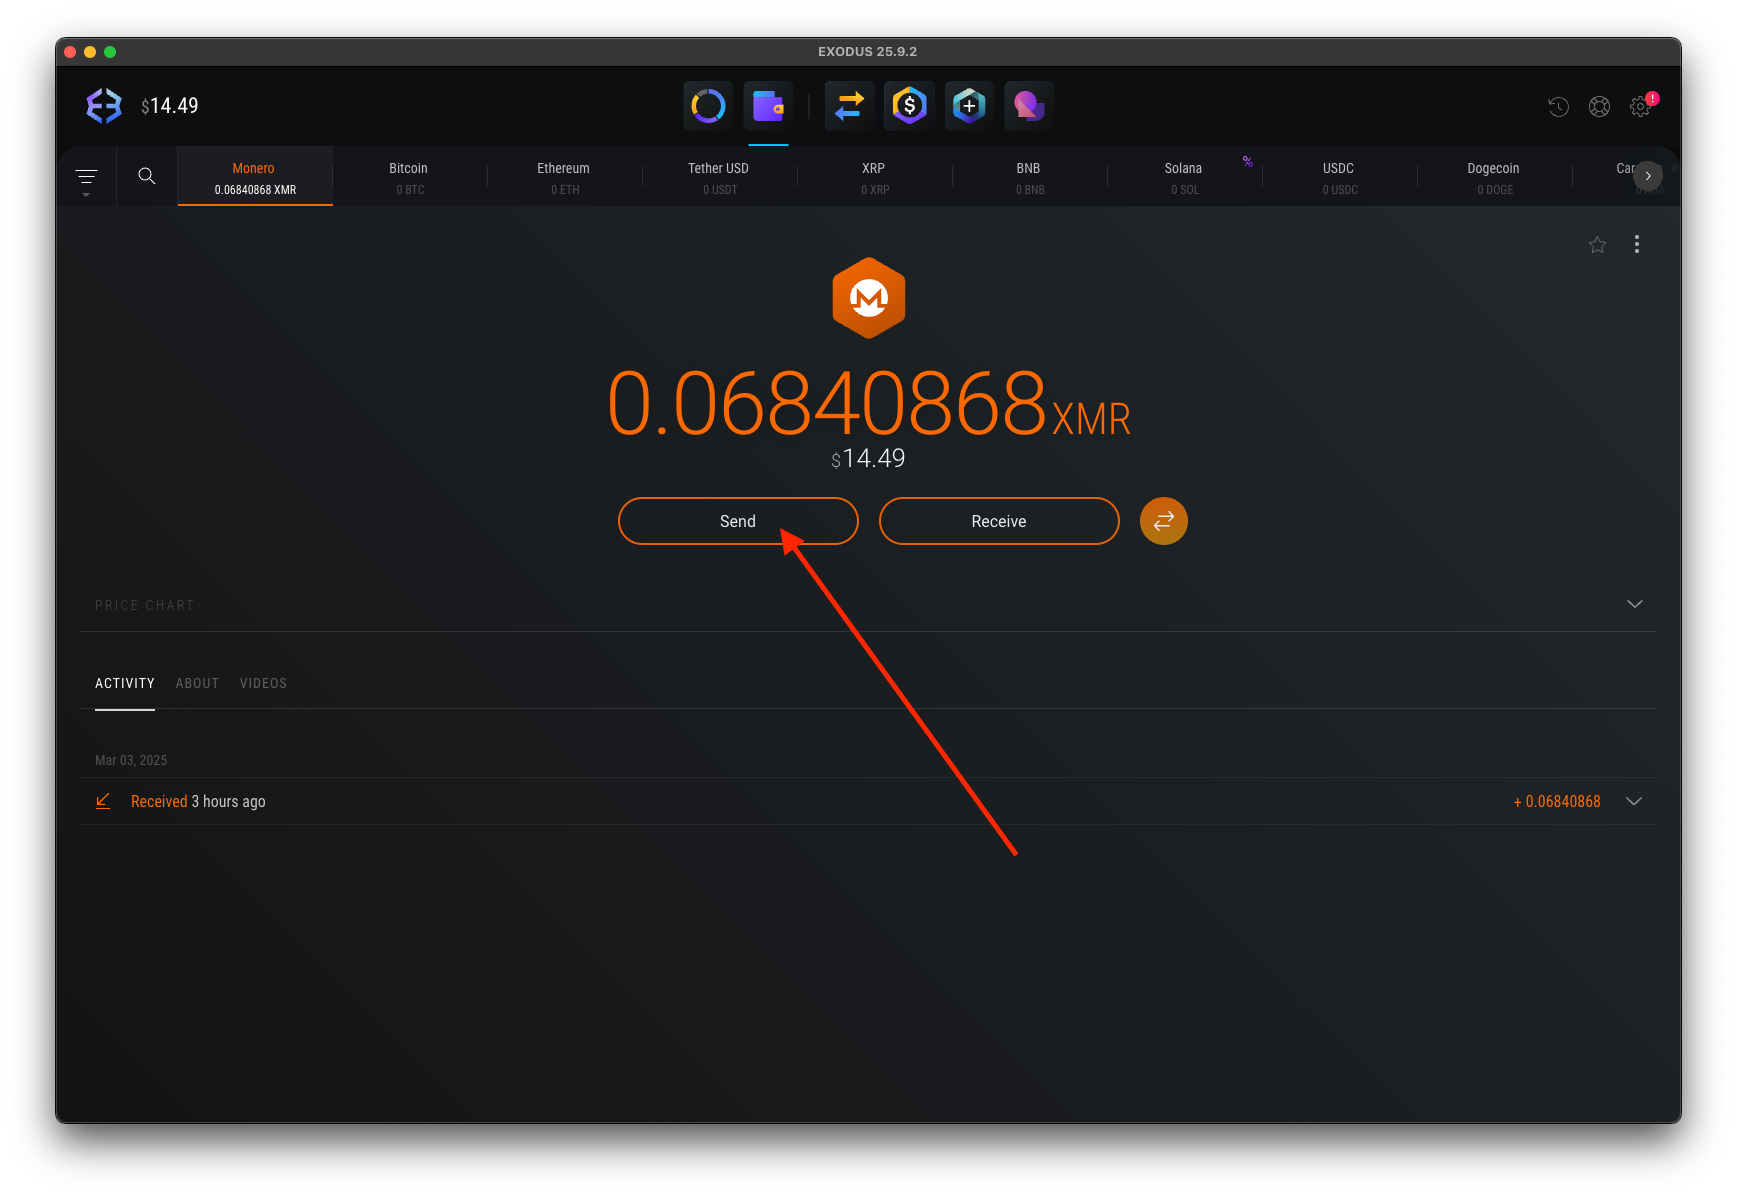
2

Click Send

  • Click Send to open the send menu

Click Send
3

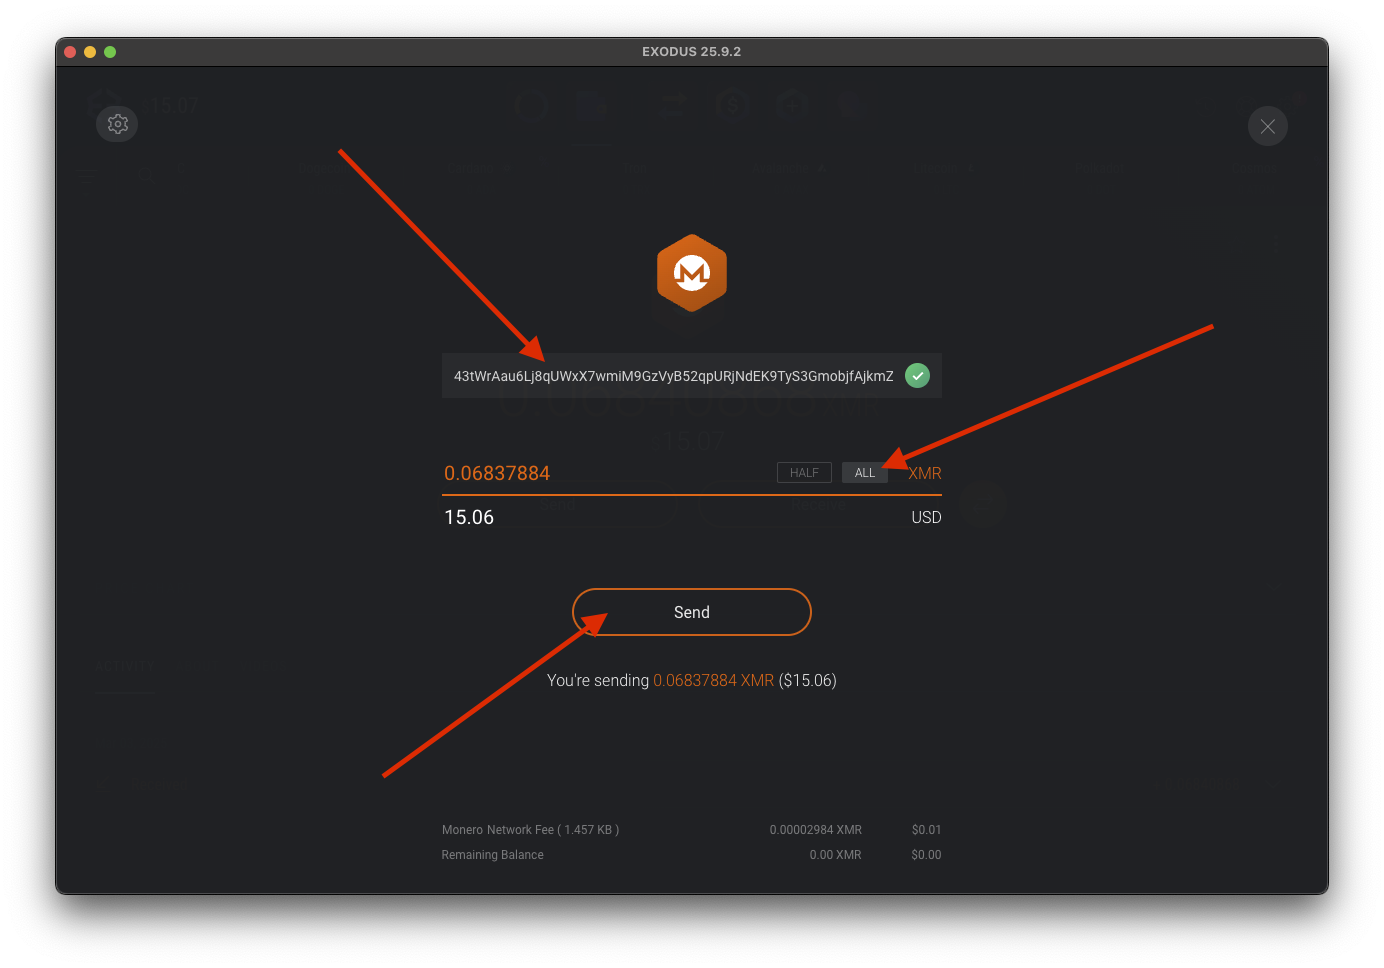
Enter address and amount

  • Paste your address from Cake Wallet into the address field (or scan a QR code on your Cake Wallet app if you have a webcam), click All on the amount field, then click Send

Feel free to send a smaller, test transaction to Cake Wallet to test if it helps you feel more comfortable before sending your entire wallet balance!

Enter address and amount
4

Finalize send

  • Continue following the on-screen instructions, and confirm the receiving address is correct on the send prompt before tapping Send

  • Once you have sent the funds, confirm they show up in your new Monero wallet in Cake

Advanced method: Exporting an existing wallet to Cake

For those who want to preserve their transaction history or have a specific reason to keep using their existing Exodus seed phrase, you can easily export it and restore in Cake Wallet. Note that this 25-word seed phrase differs from the general 12-word seed phrase that Exodus uses for other cryptocurrencies, and must be backed up separately before you can restore your Monero wallet in Cake Wallet.

Backing up your Monero from Exodus Mobile

1

Open Monero in Exodus

  • On the home page of Exodus, scroll down and tap on Monero

2

Open settings

  • Tap the ⚙️ icon at the top right

3

Save creation height

  • Copy the wallet creation height and save it for later

Note: Using the wallet creation height when restoring in Cake Wallet will drastically reduce the initial sync time, so be sure to save it somewhere!

4

View private key

  • Tap View Private Key

  • Confirm that you're in a safe place and are OK to display your private keys on-screen

  • Either tap the copy button, or write down your 25-word seed phrase (in the box labeled Mnemonic) in a safe place where you can import it into Cake Wallet in the next section. Recommended options:

    • Storing your seed in an end-to-end encrypted password manager like Bitwarden, Proton Pass, or iCloud Keychain

    • Writing it down and keeping it in a secure place

Backing up your Monero from Exodus Desktop
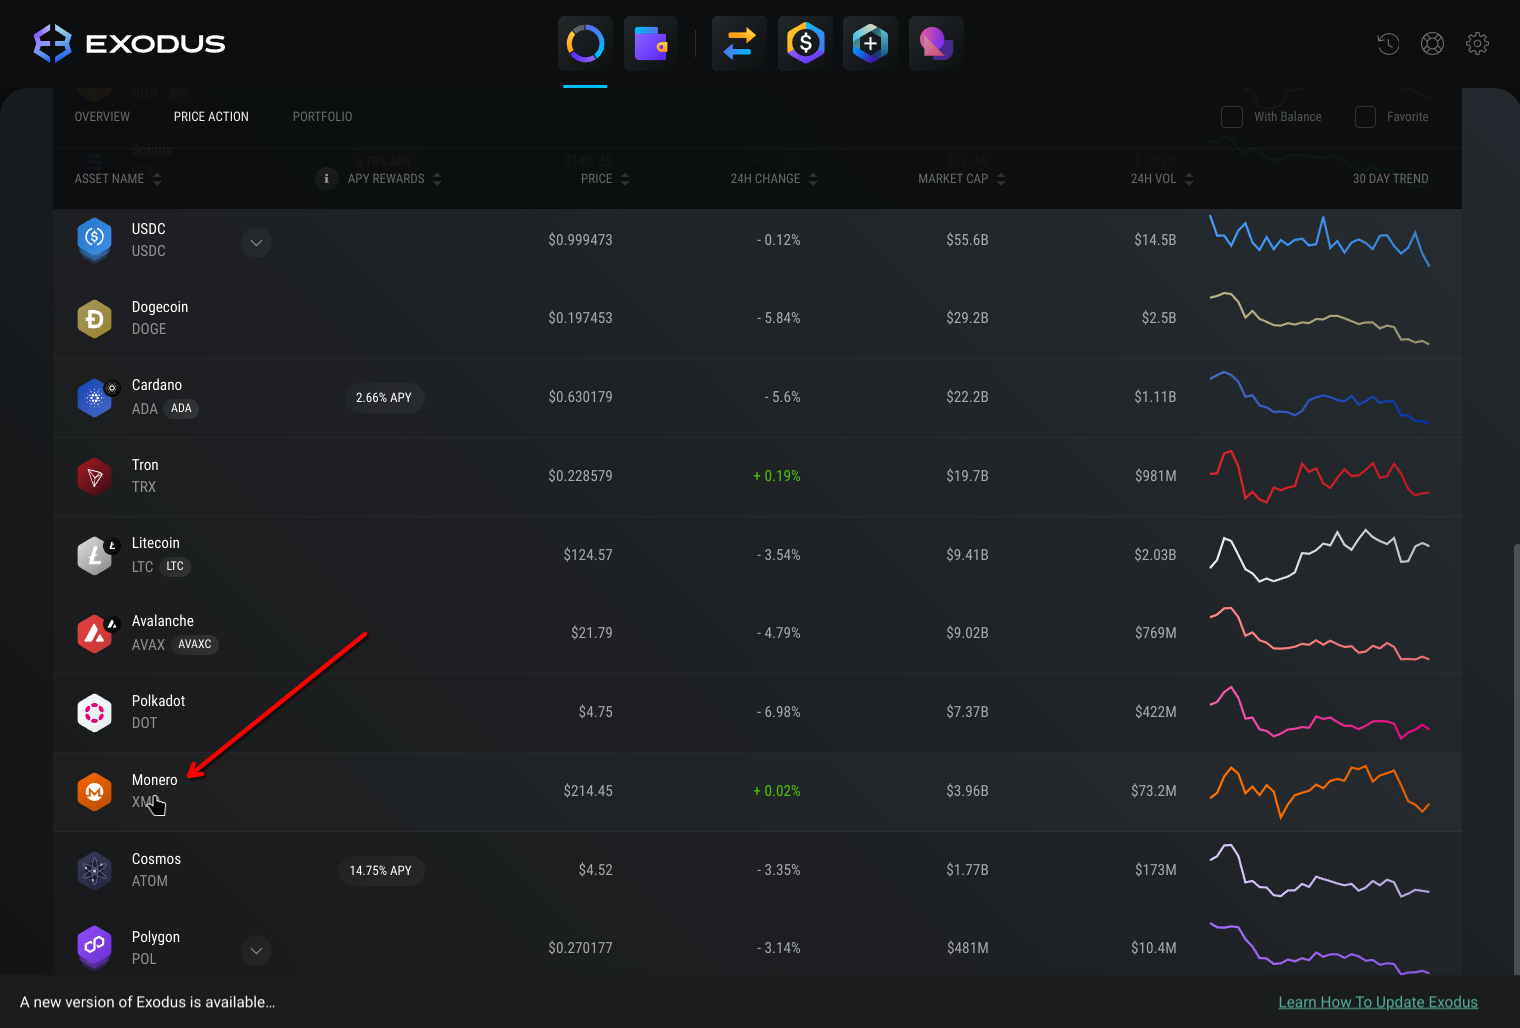
1

Open Monero wallet page

  • From the Portfolio page, scroll down to find your Monero wallet, and click on it to open the Monero wallet page.

Open the Monero wallet page
2

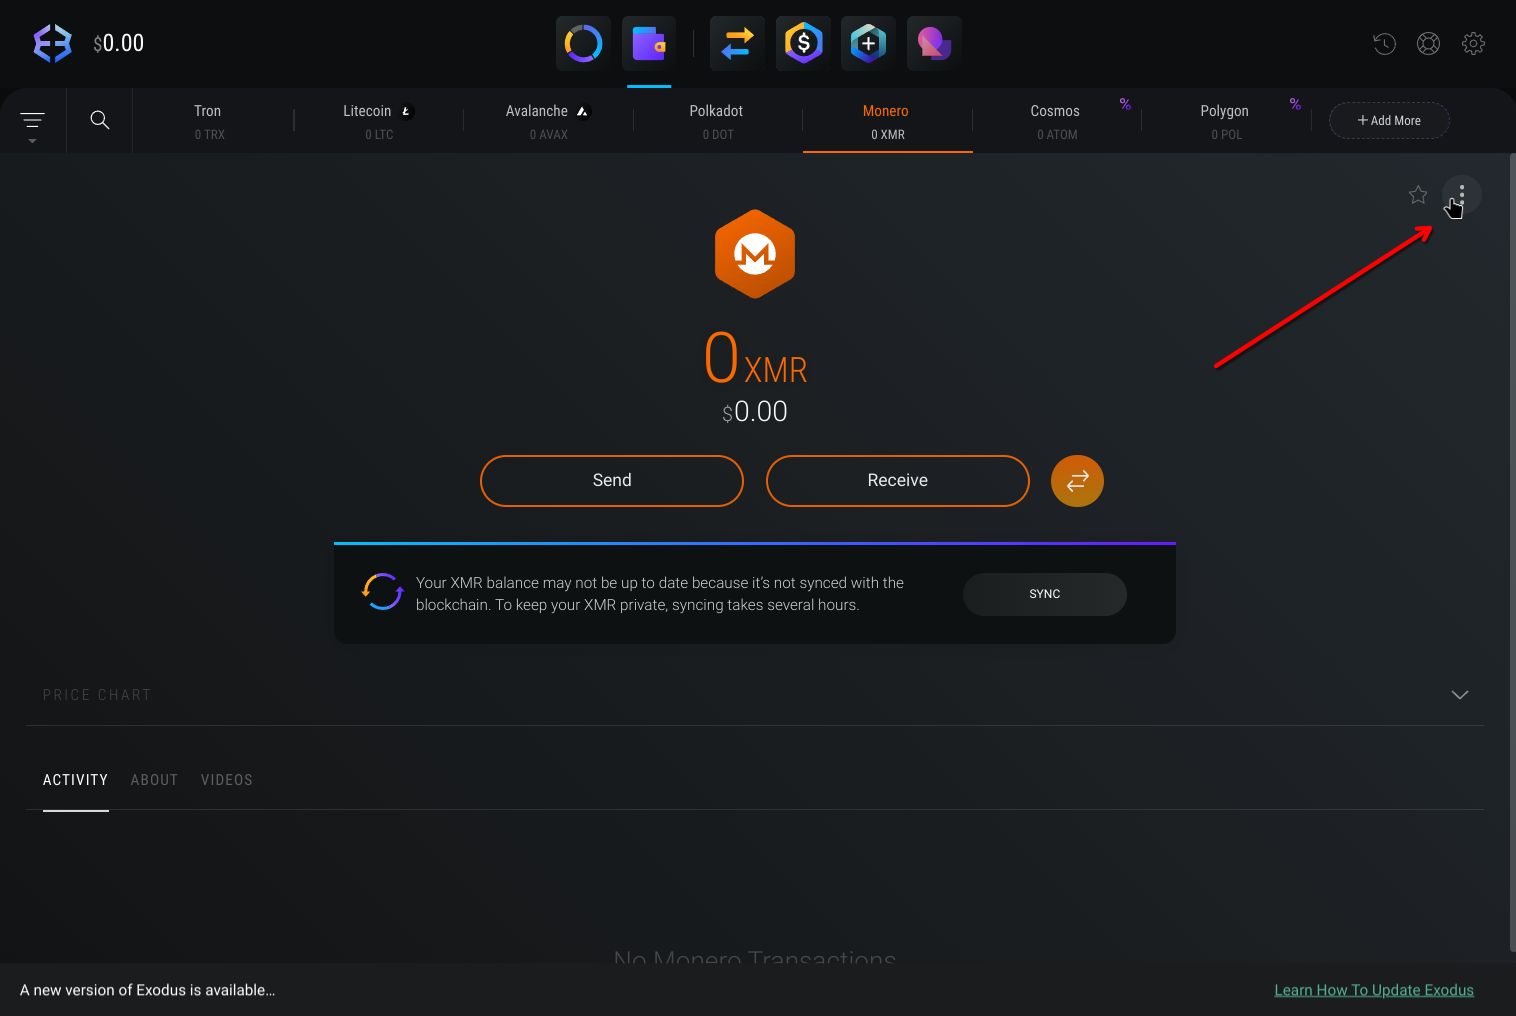
Open menu

  • Once you are on the Monero wallet page, click the three dots near the top right to open a menu

Open the wallet menu
3

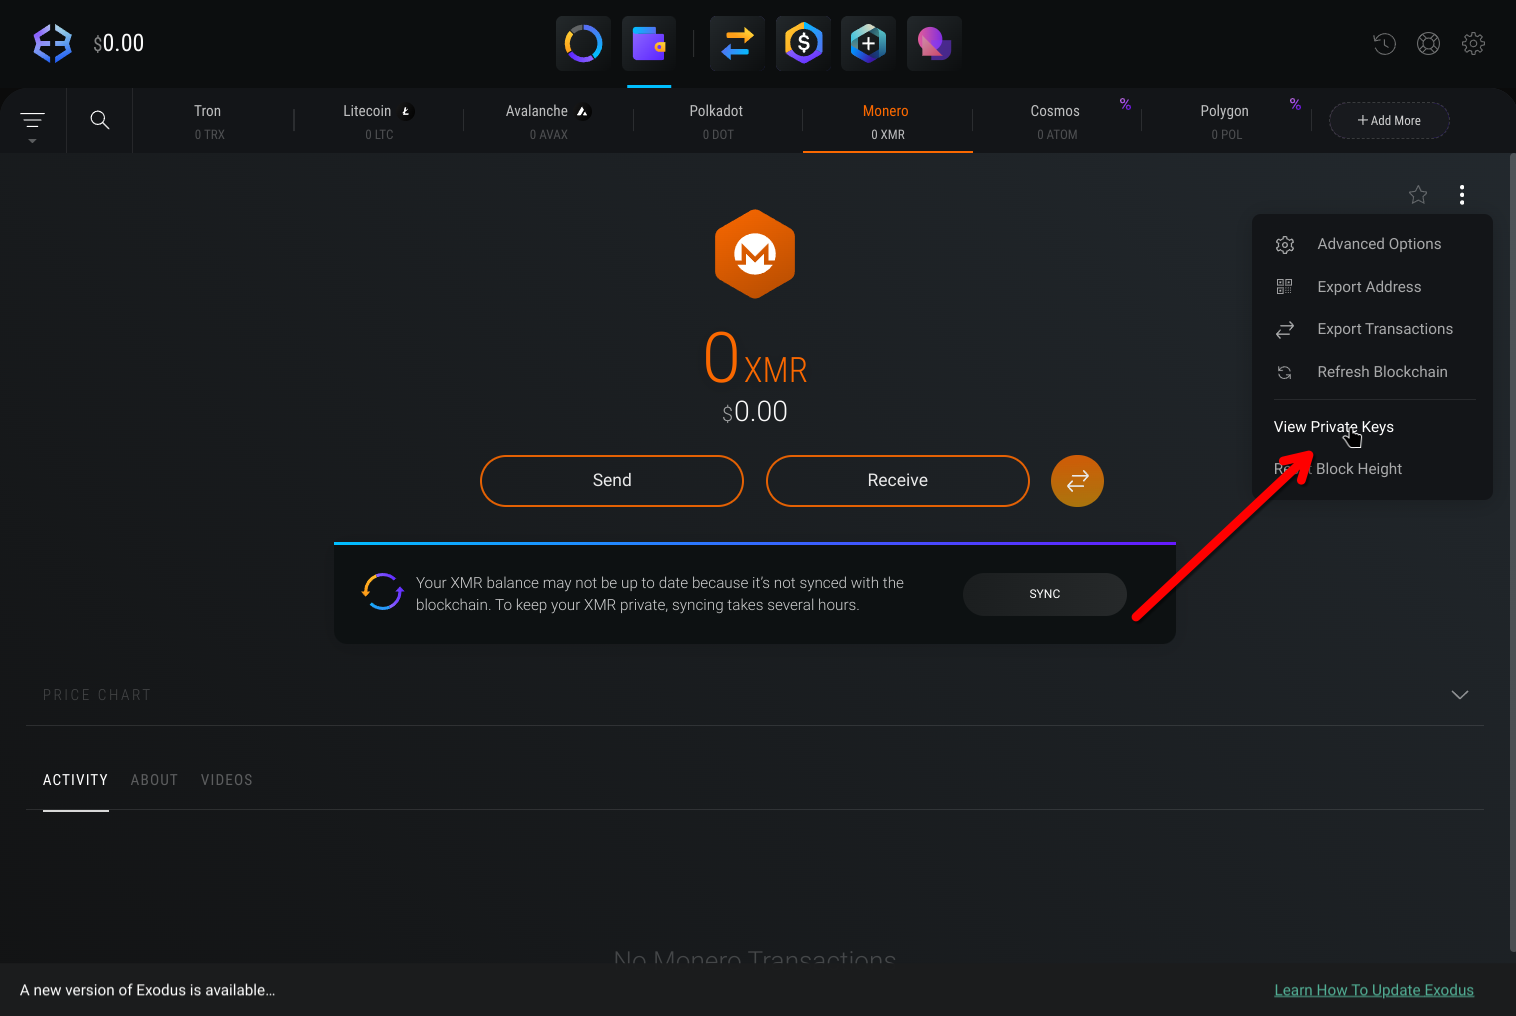
View private keys

  • Click View Private Keys

Click View Private Keys
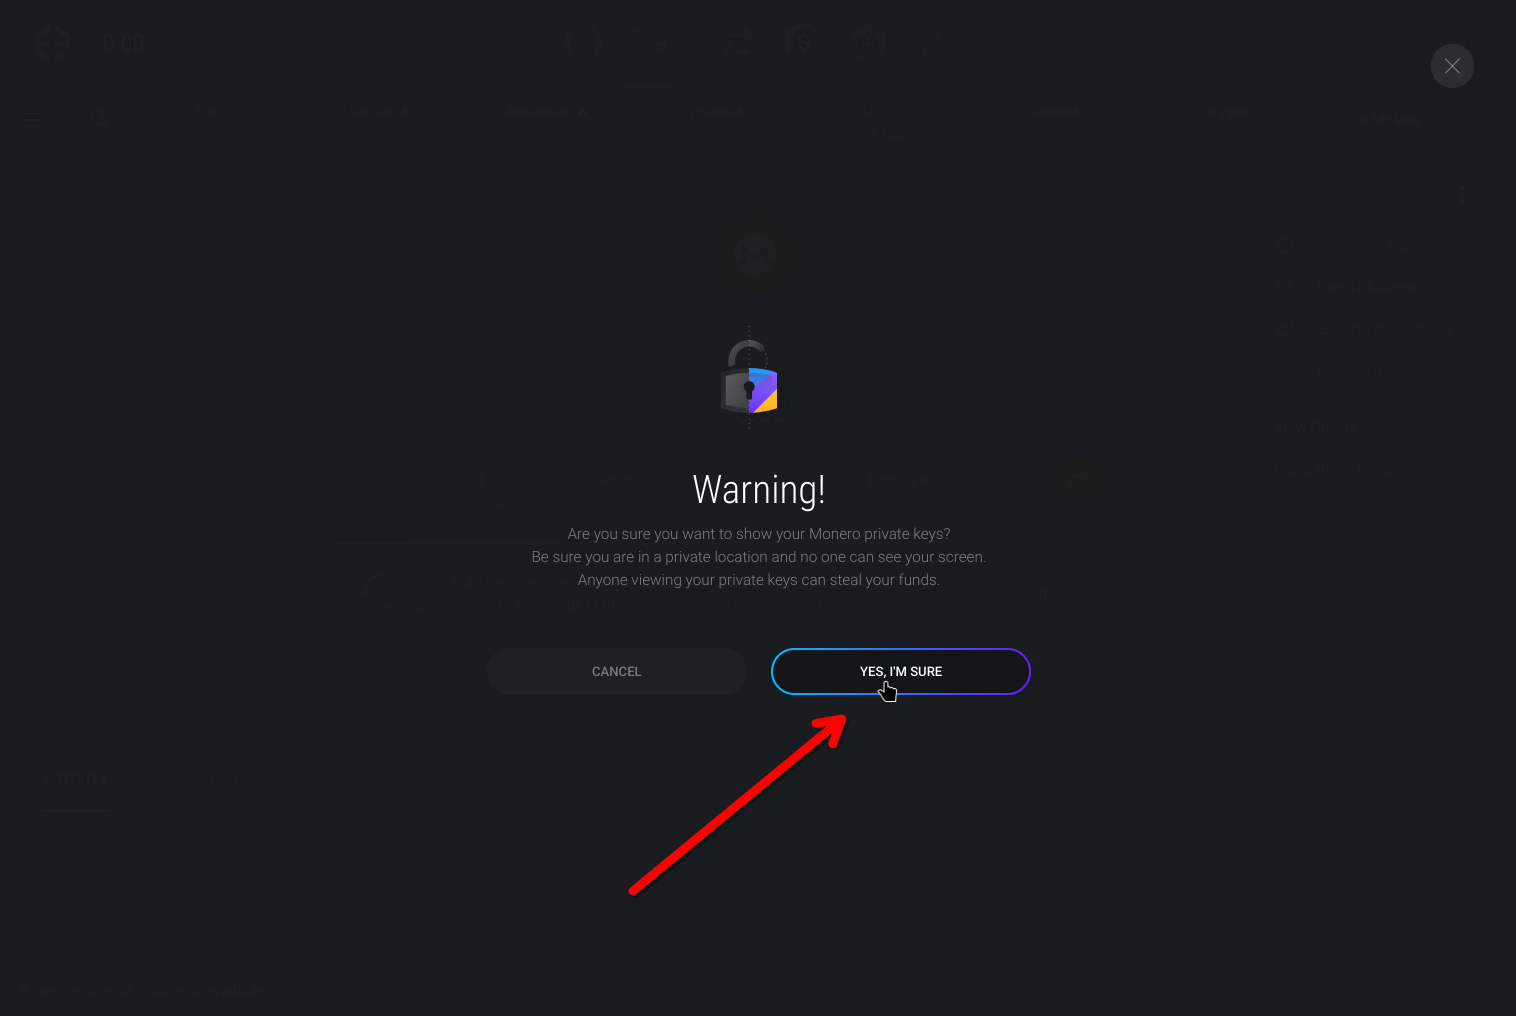
  • Click Yes, I'm Sure

Confirm to view private keys
4

Copy seed phrase

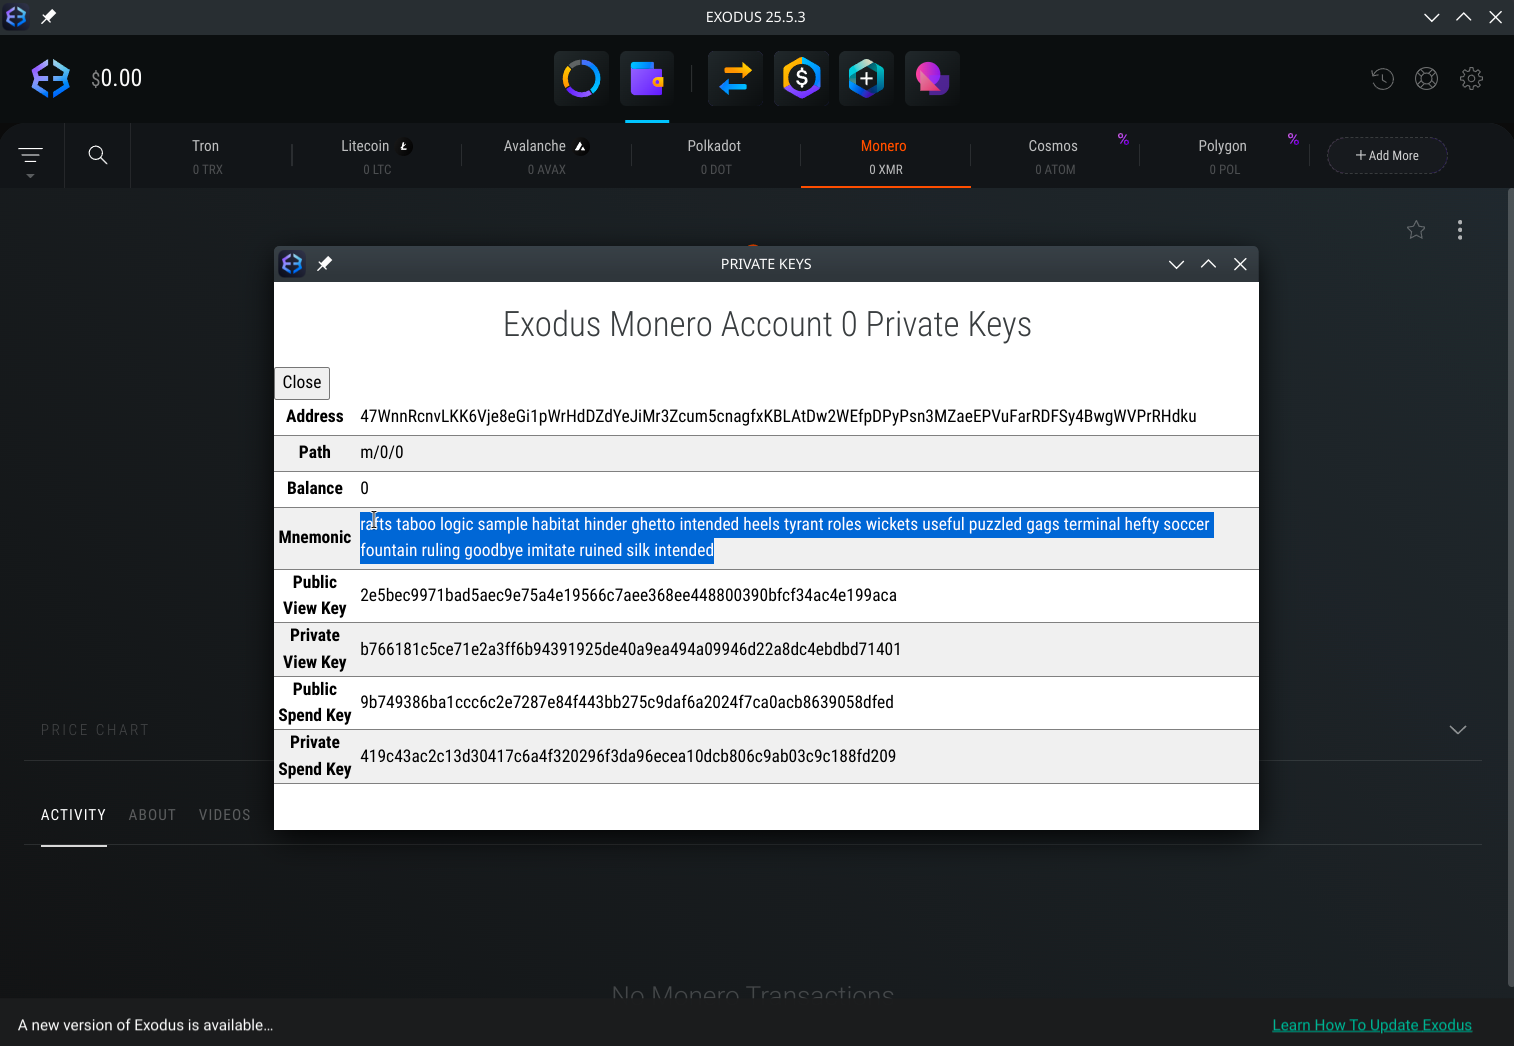
  • Copy the words from the Mnemonic field to your clipboard, this is also known as the seed phrase

Copy the Mnemonic field
  • Store your seed phrase in a safe place where you can import it into Cake Wallet in the next section. Recommended options:

    • Storing your seed in an end-to-end encrypted password manager like Bitwarden, Proton Pass, or iCloud Keychain

    • Writing it down and keeping it in a secure place

Restoring your wallet in Cake Wallet
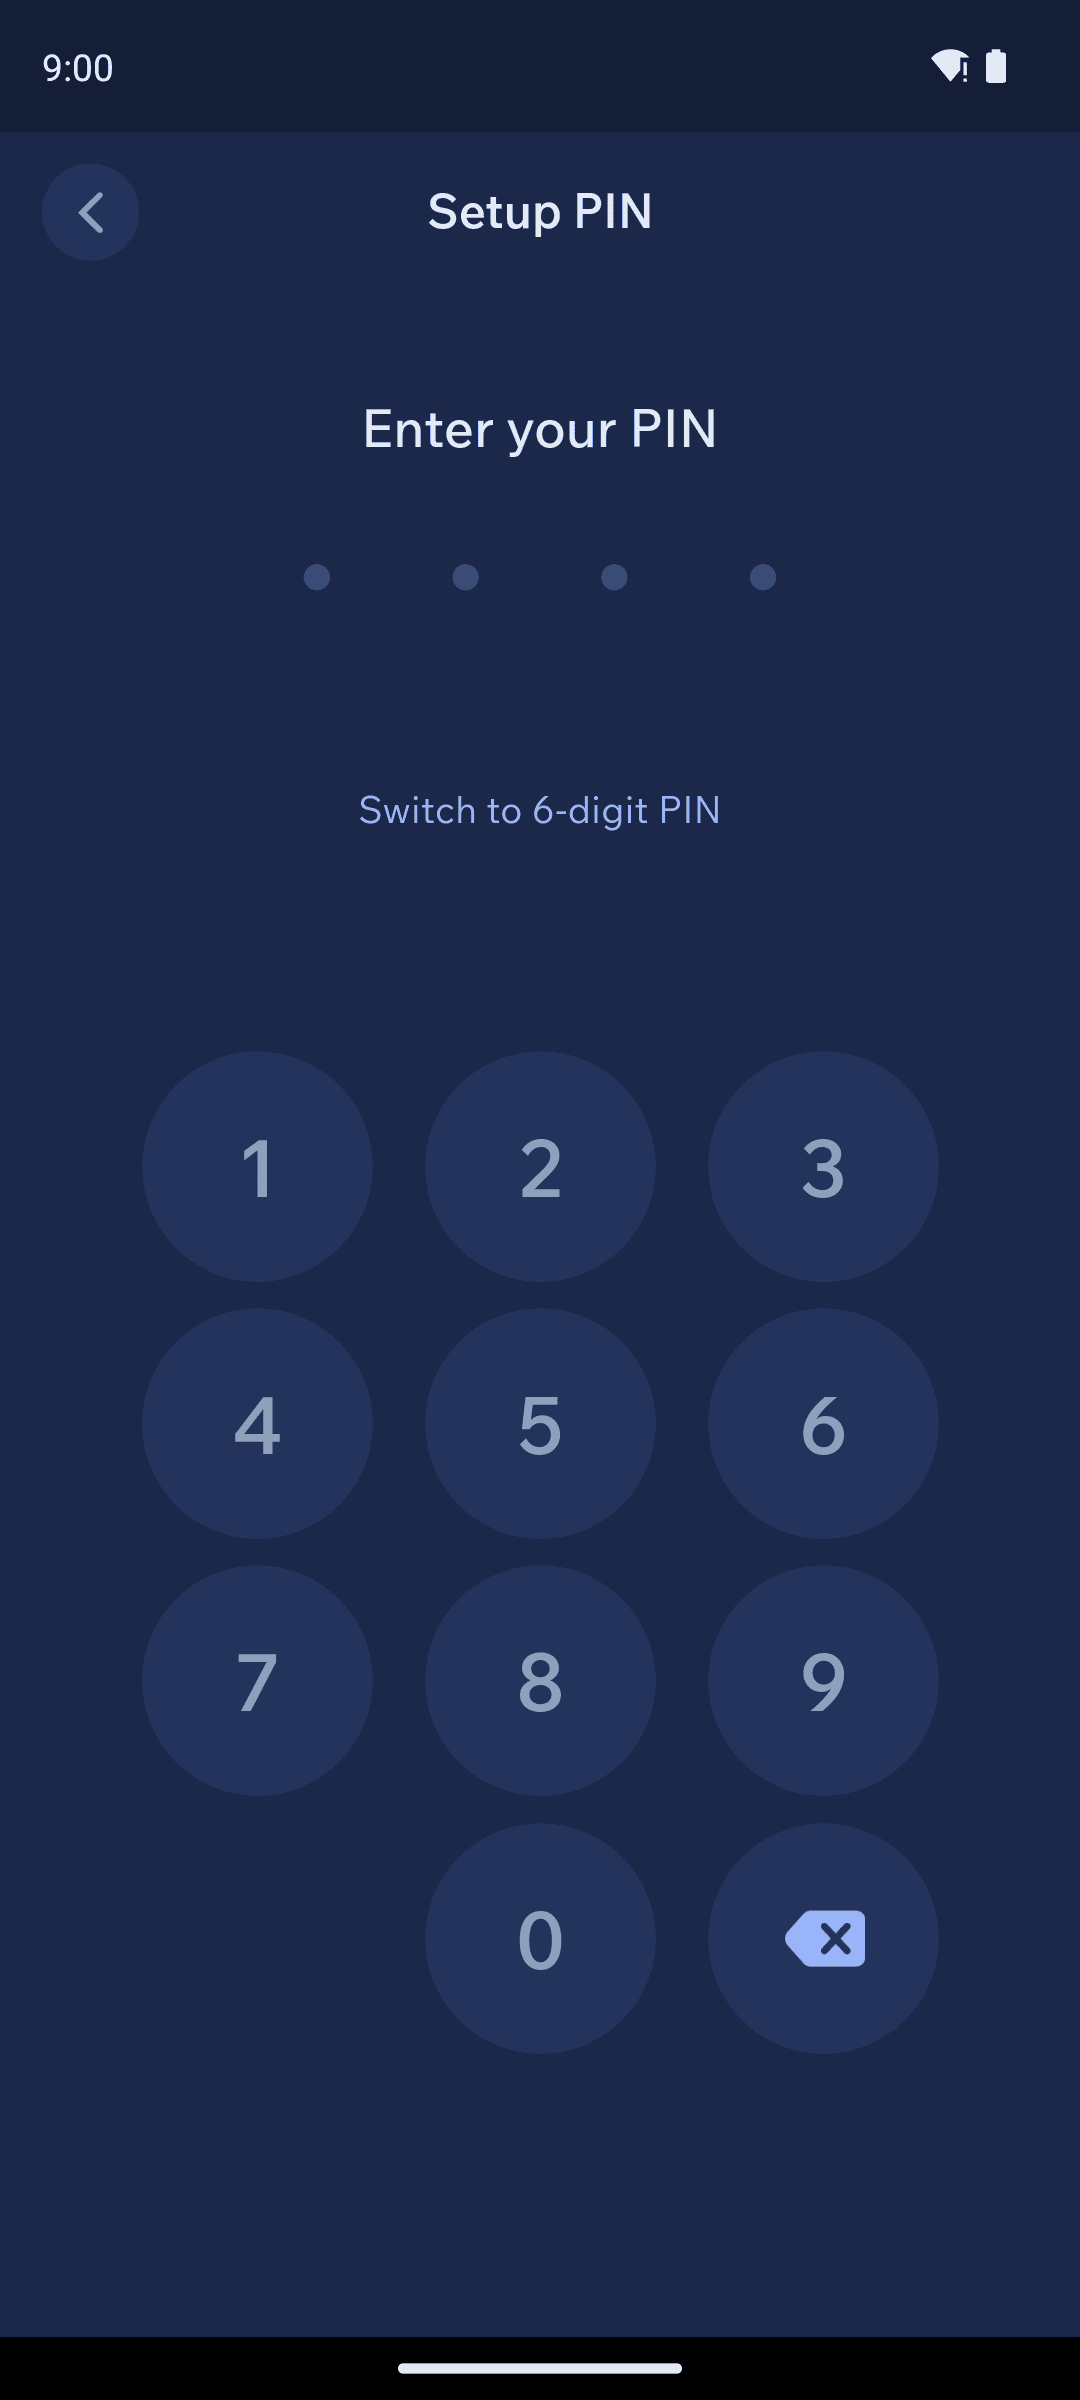
1

Set a PIN

  • Tap Set a PIN and set a PIN for the app

Set a PIN
2

Restore existing wallet

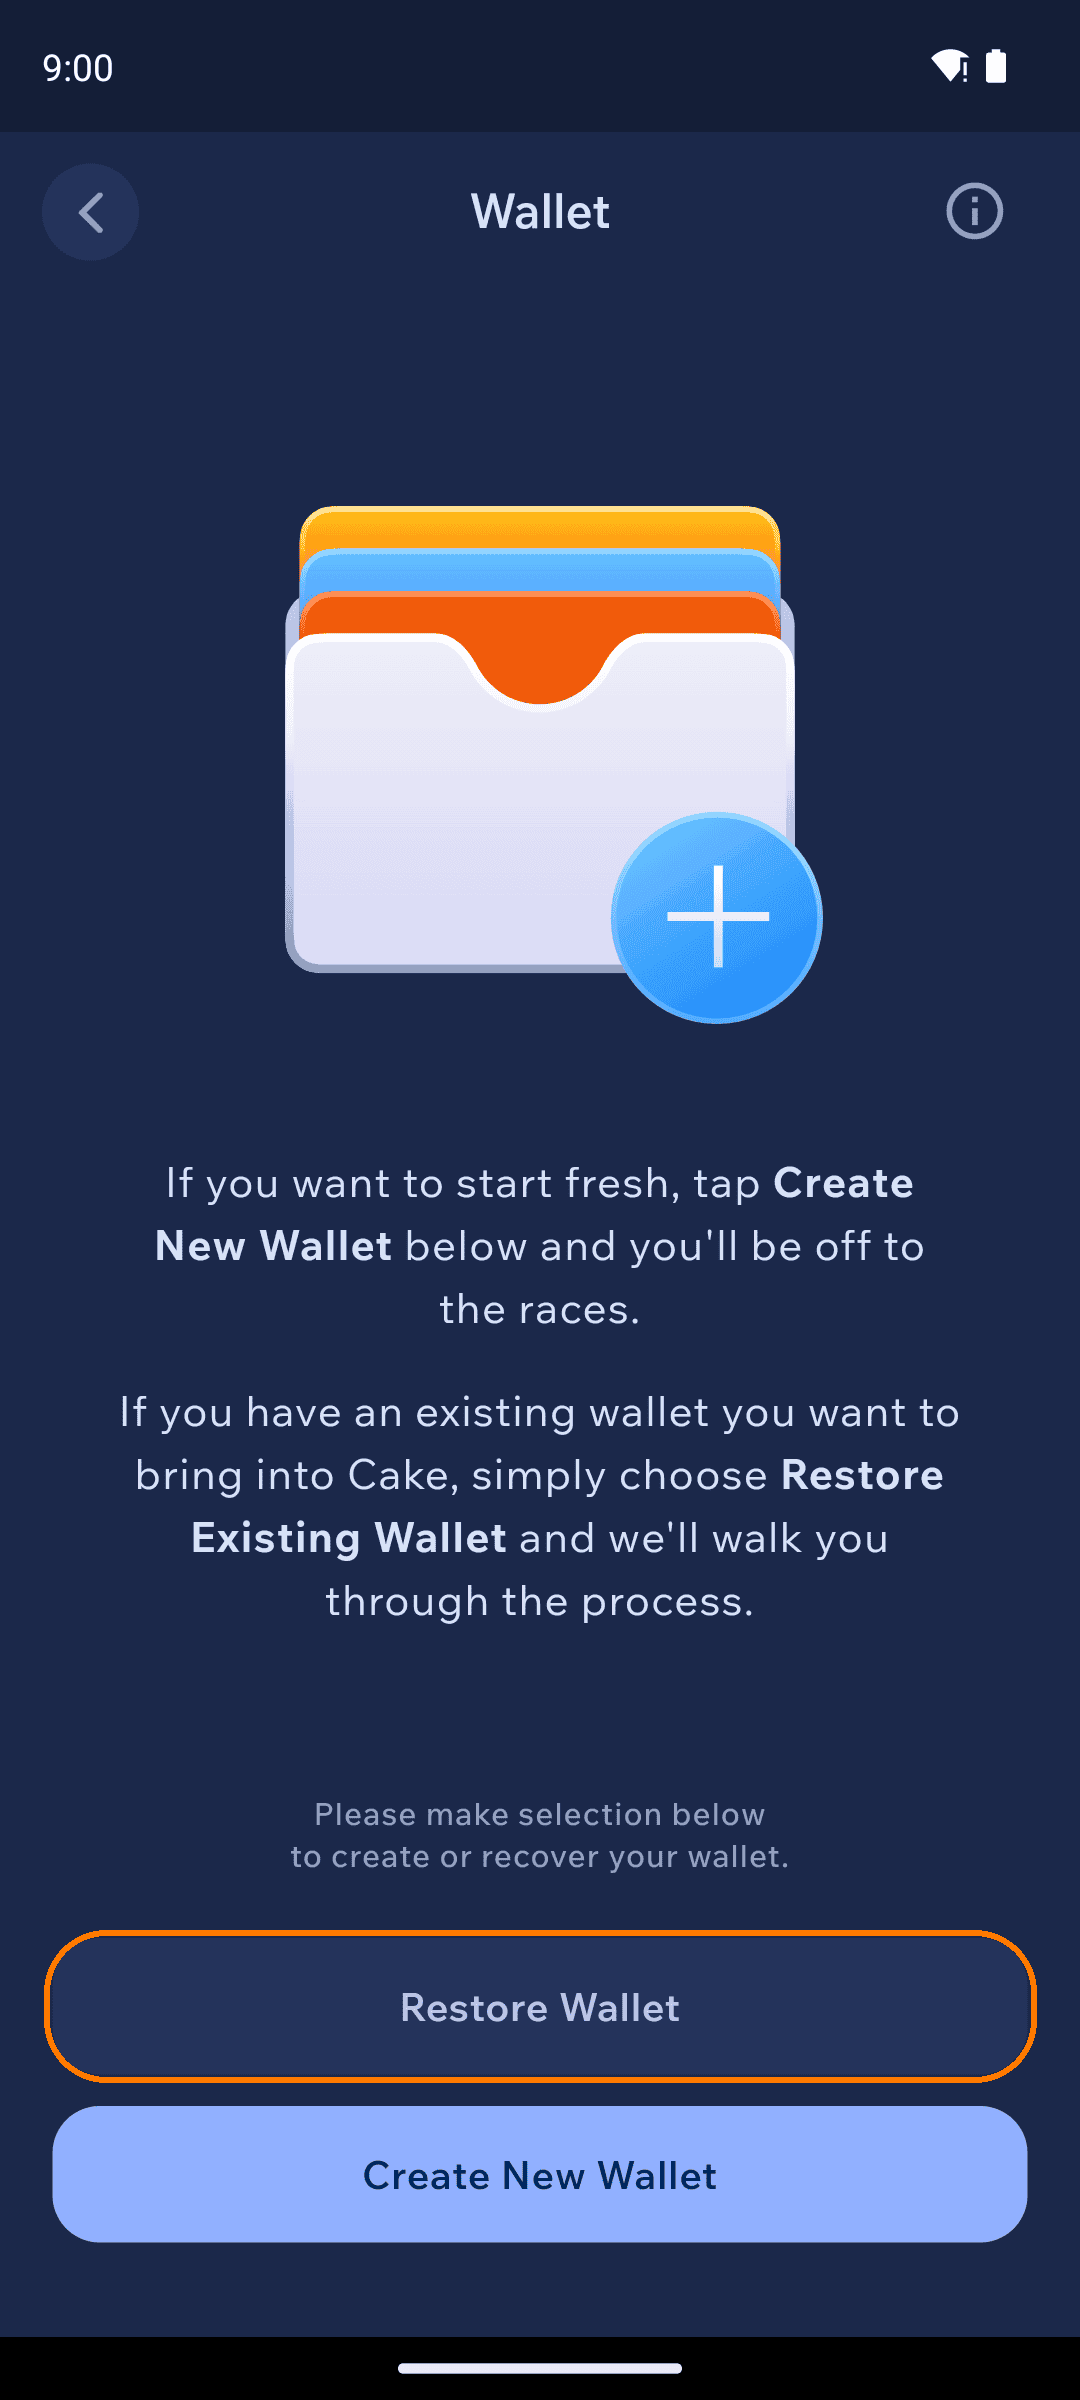
  • Tap Restore Wallet

Restore Wallet
3

Restore from Seed or Keys

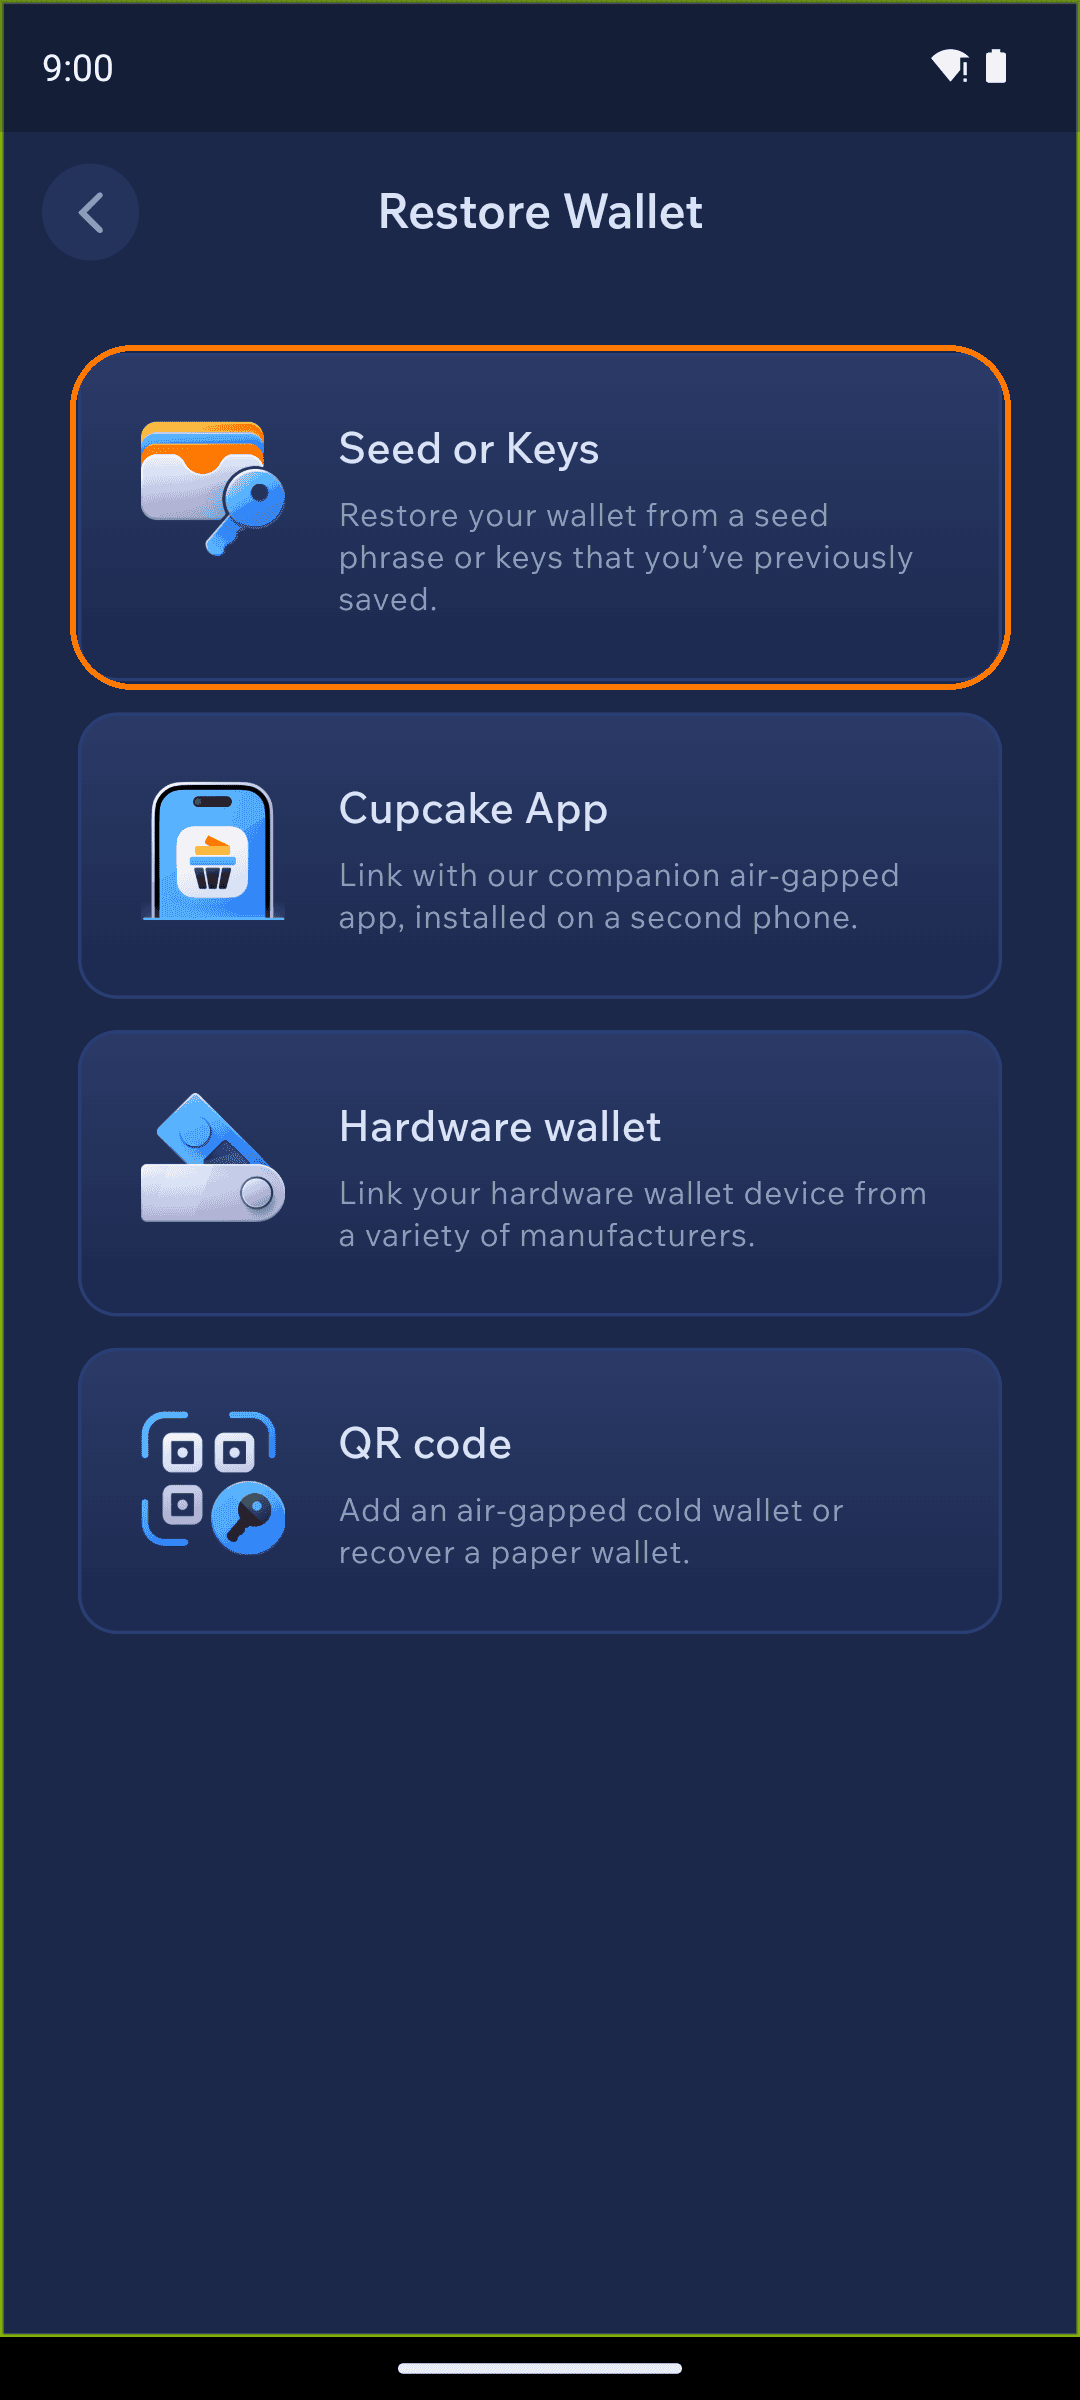
  • Tap Seed or Keys

Choose Seed or Keys
4

Select Monero

  • Select Monero from the list of currencies

5

Enter your name and seed phrase

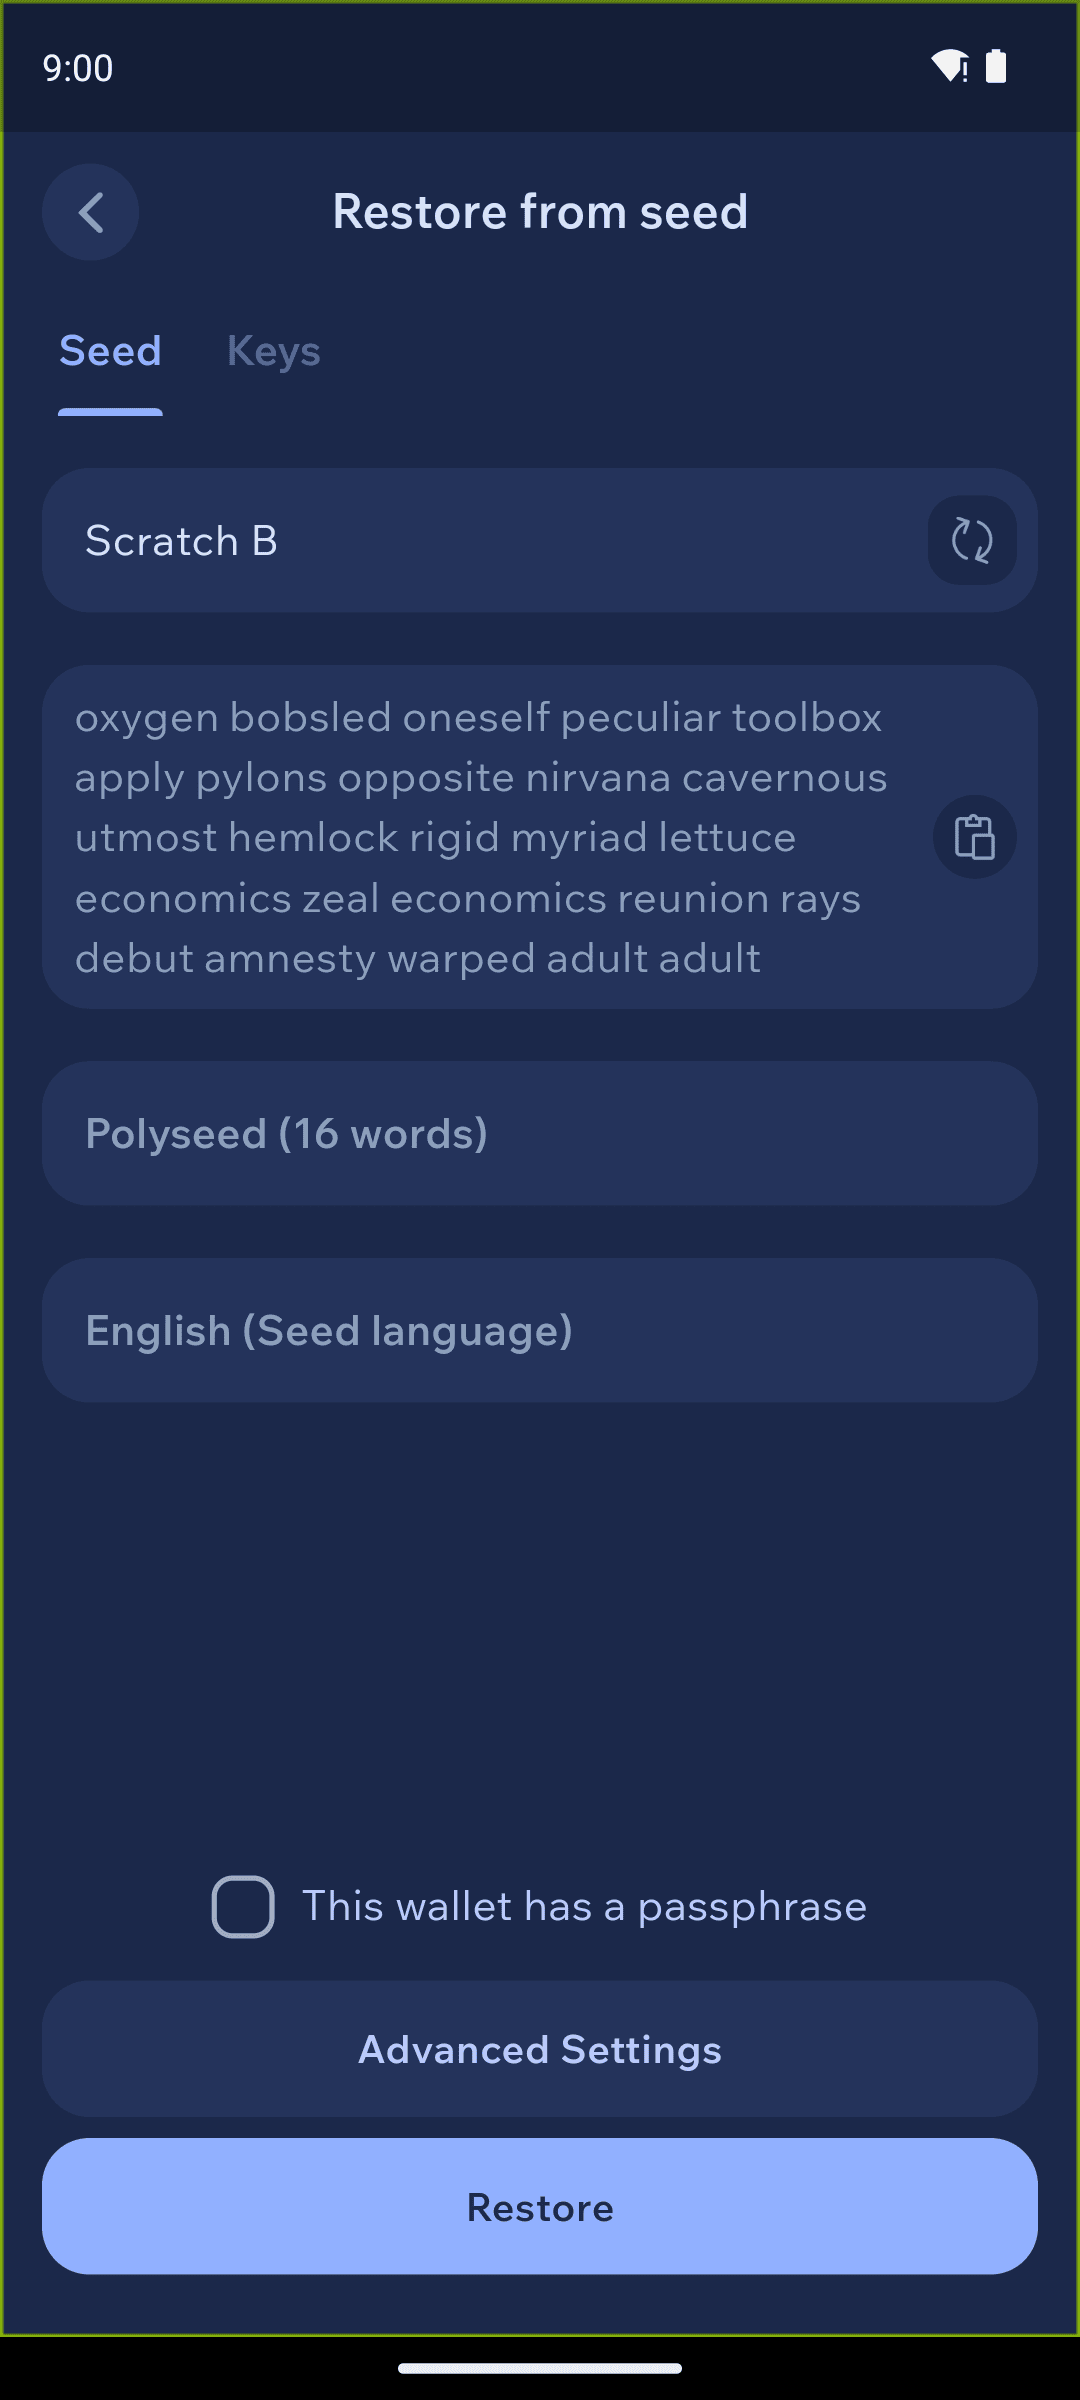
  • Give the wallet a name, then paste or type in the 25-word seed phrase from your Exodus wallet that you backed up earlier

Enter your seed phrase
6

Select the Legacy seed type

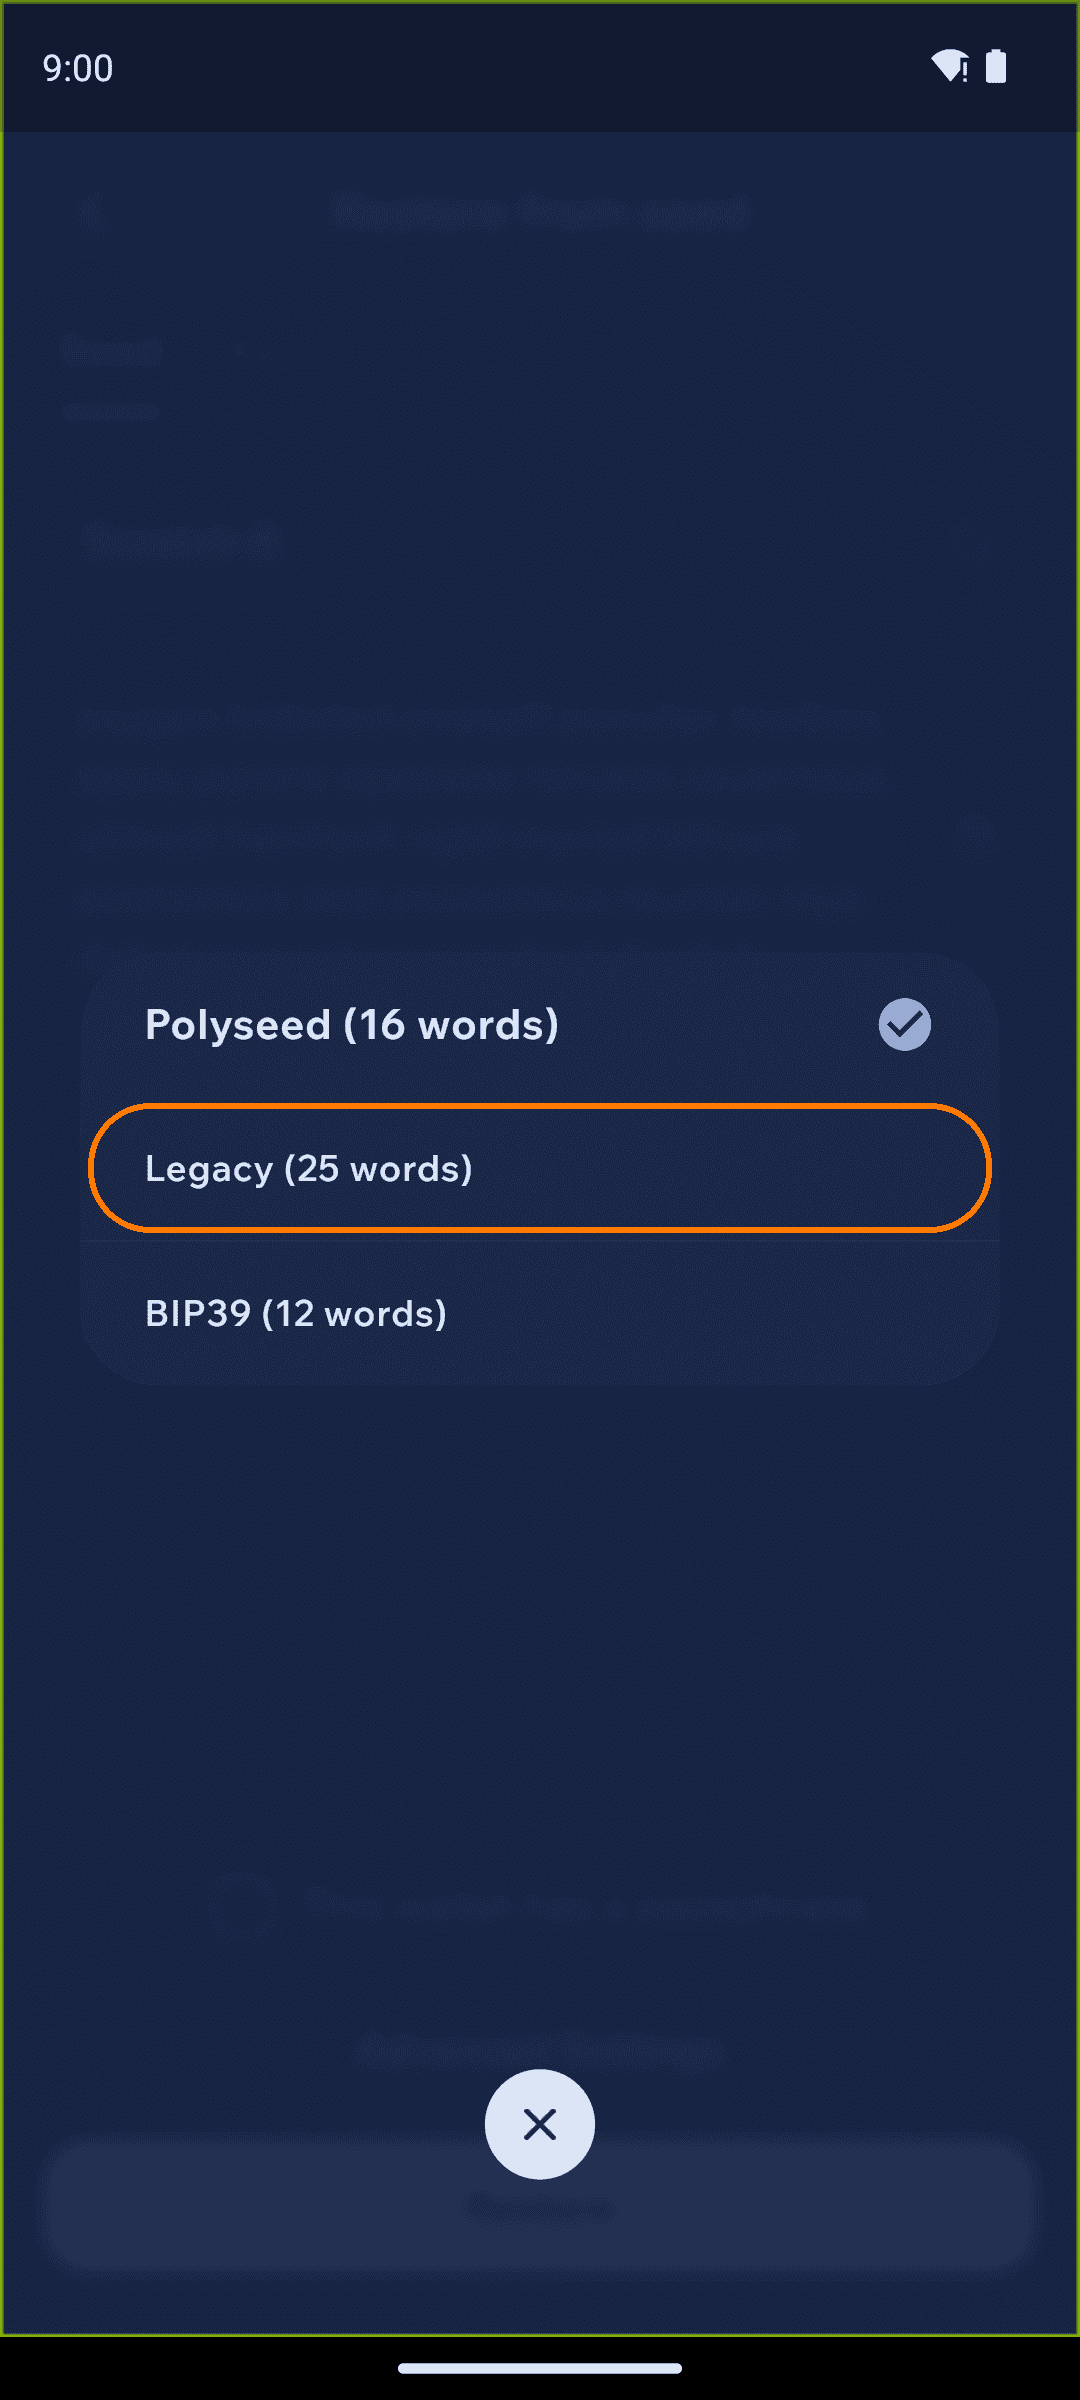
  • Tap the seed-type selector and change it from Polyseed (16 words) to Legacy (25 words)

Choose the Legacy (25 words) seed type
7

Enter creation height and restore

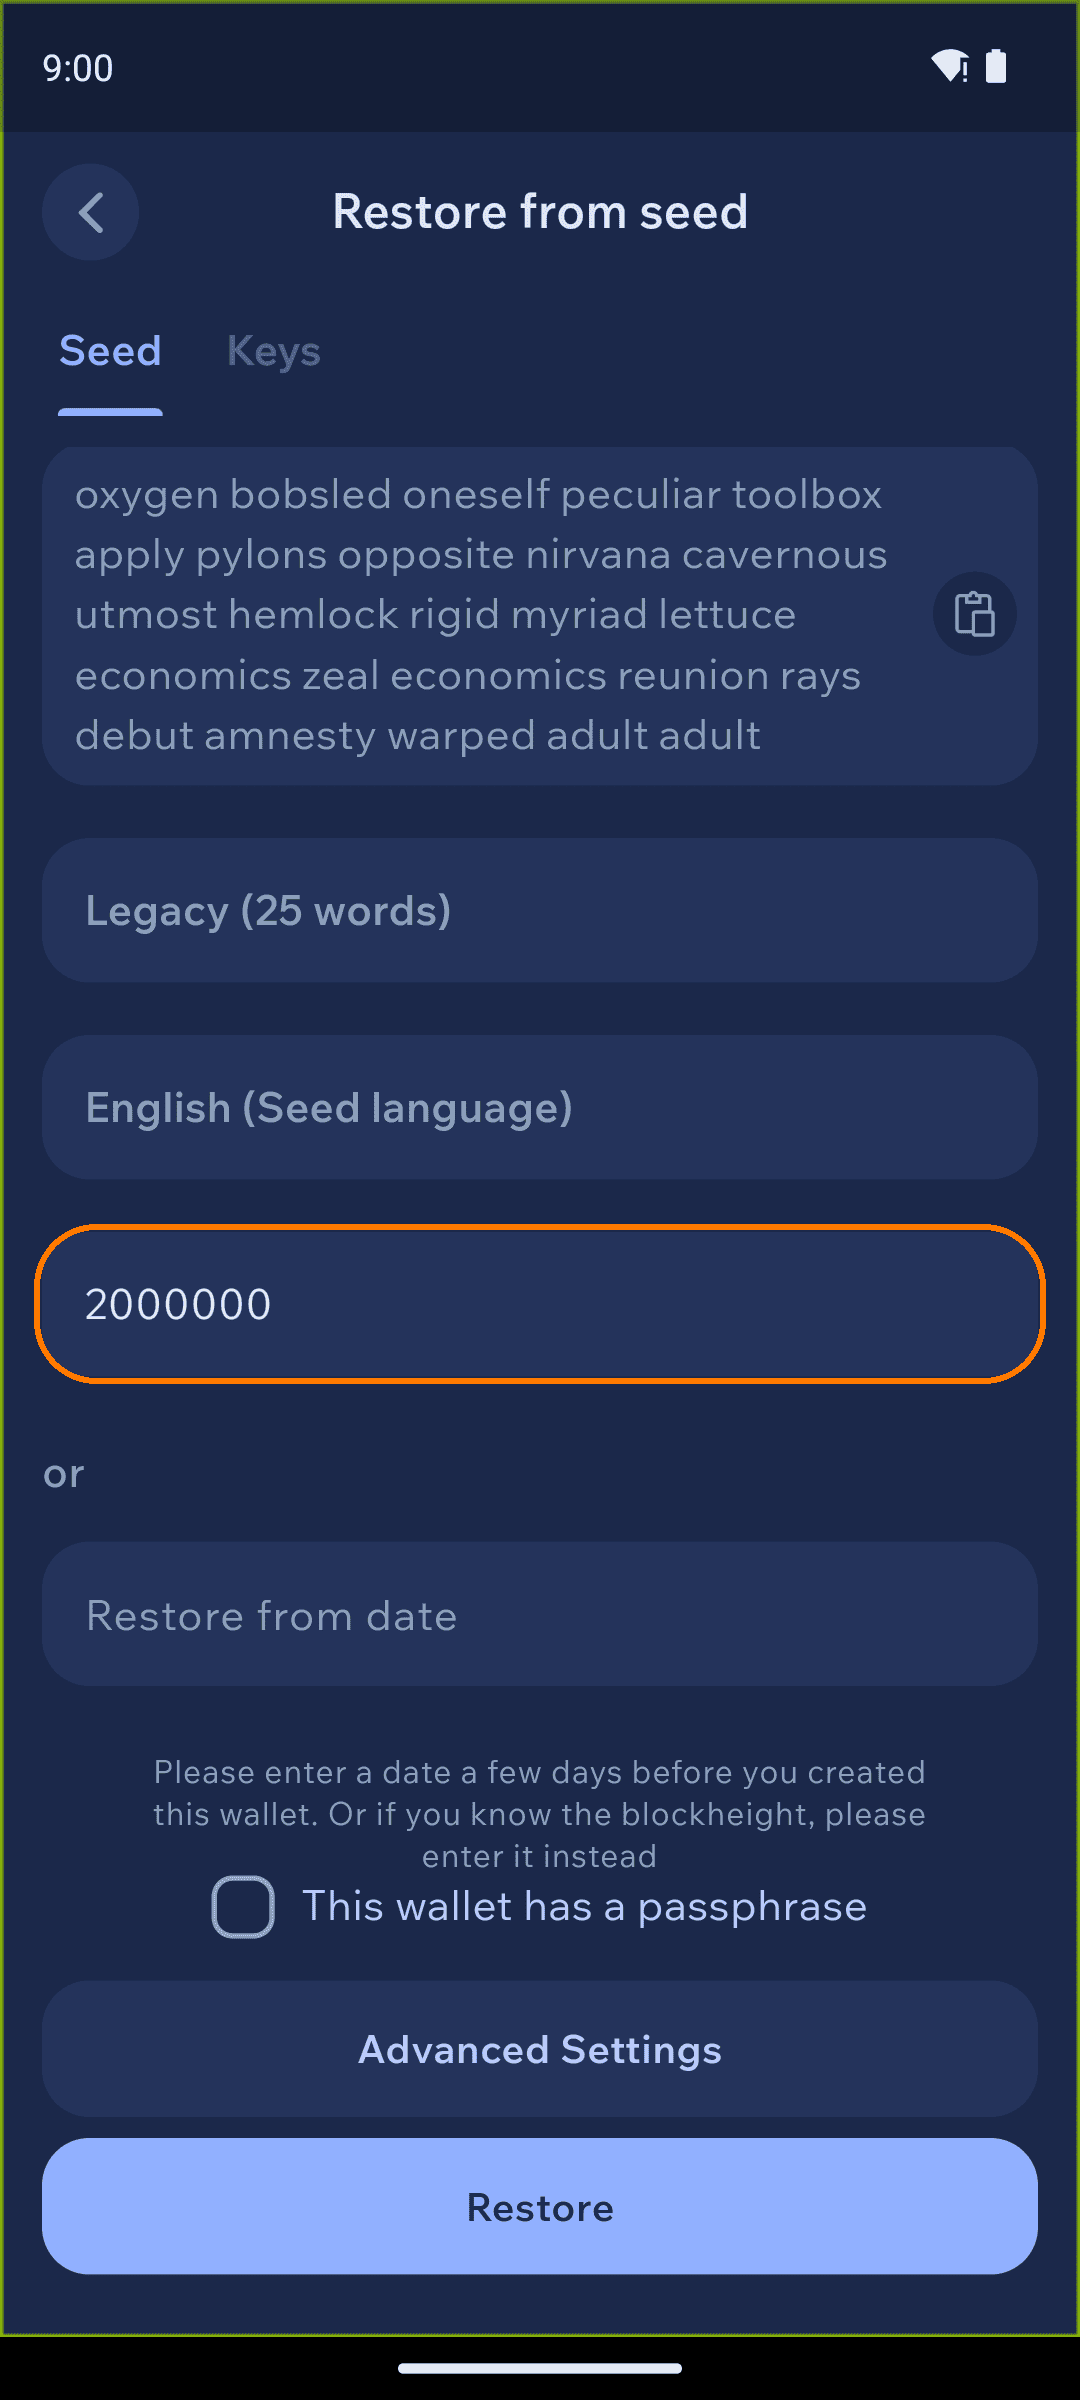
  • Below the seed phrase, enter the saved wallet creation height number from your Exodus Monero wallet (for example 3344621). If you didn't save it, tap Restore from date instead and choose roughly when you created the wallet.

Enter the wallet creation height
  • Tap Restore

8

Synchronization

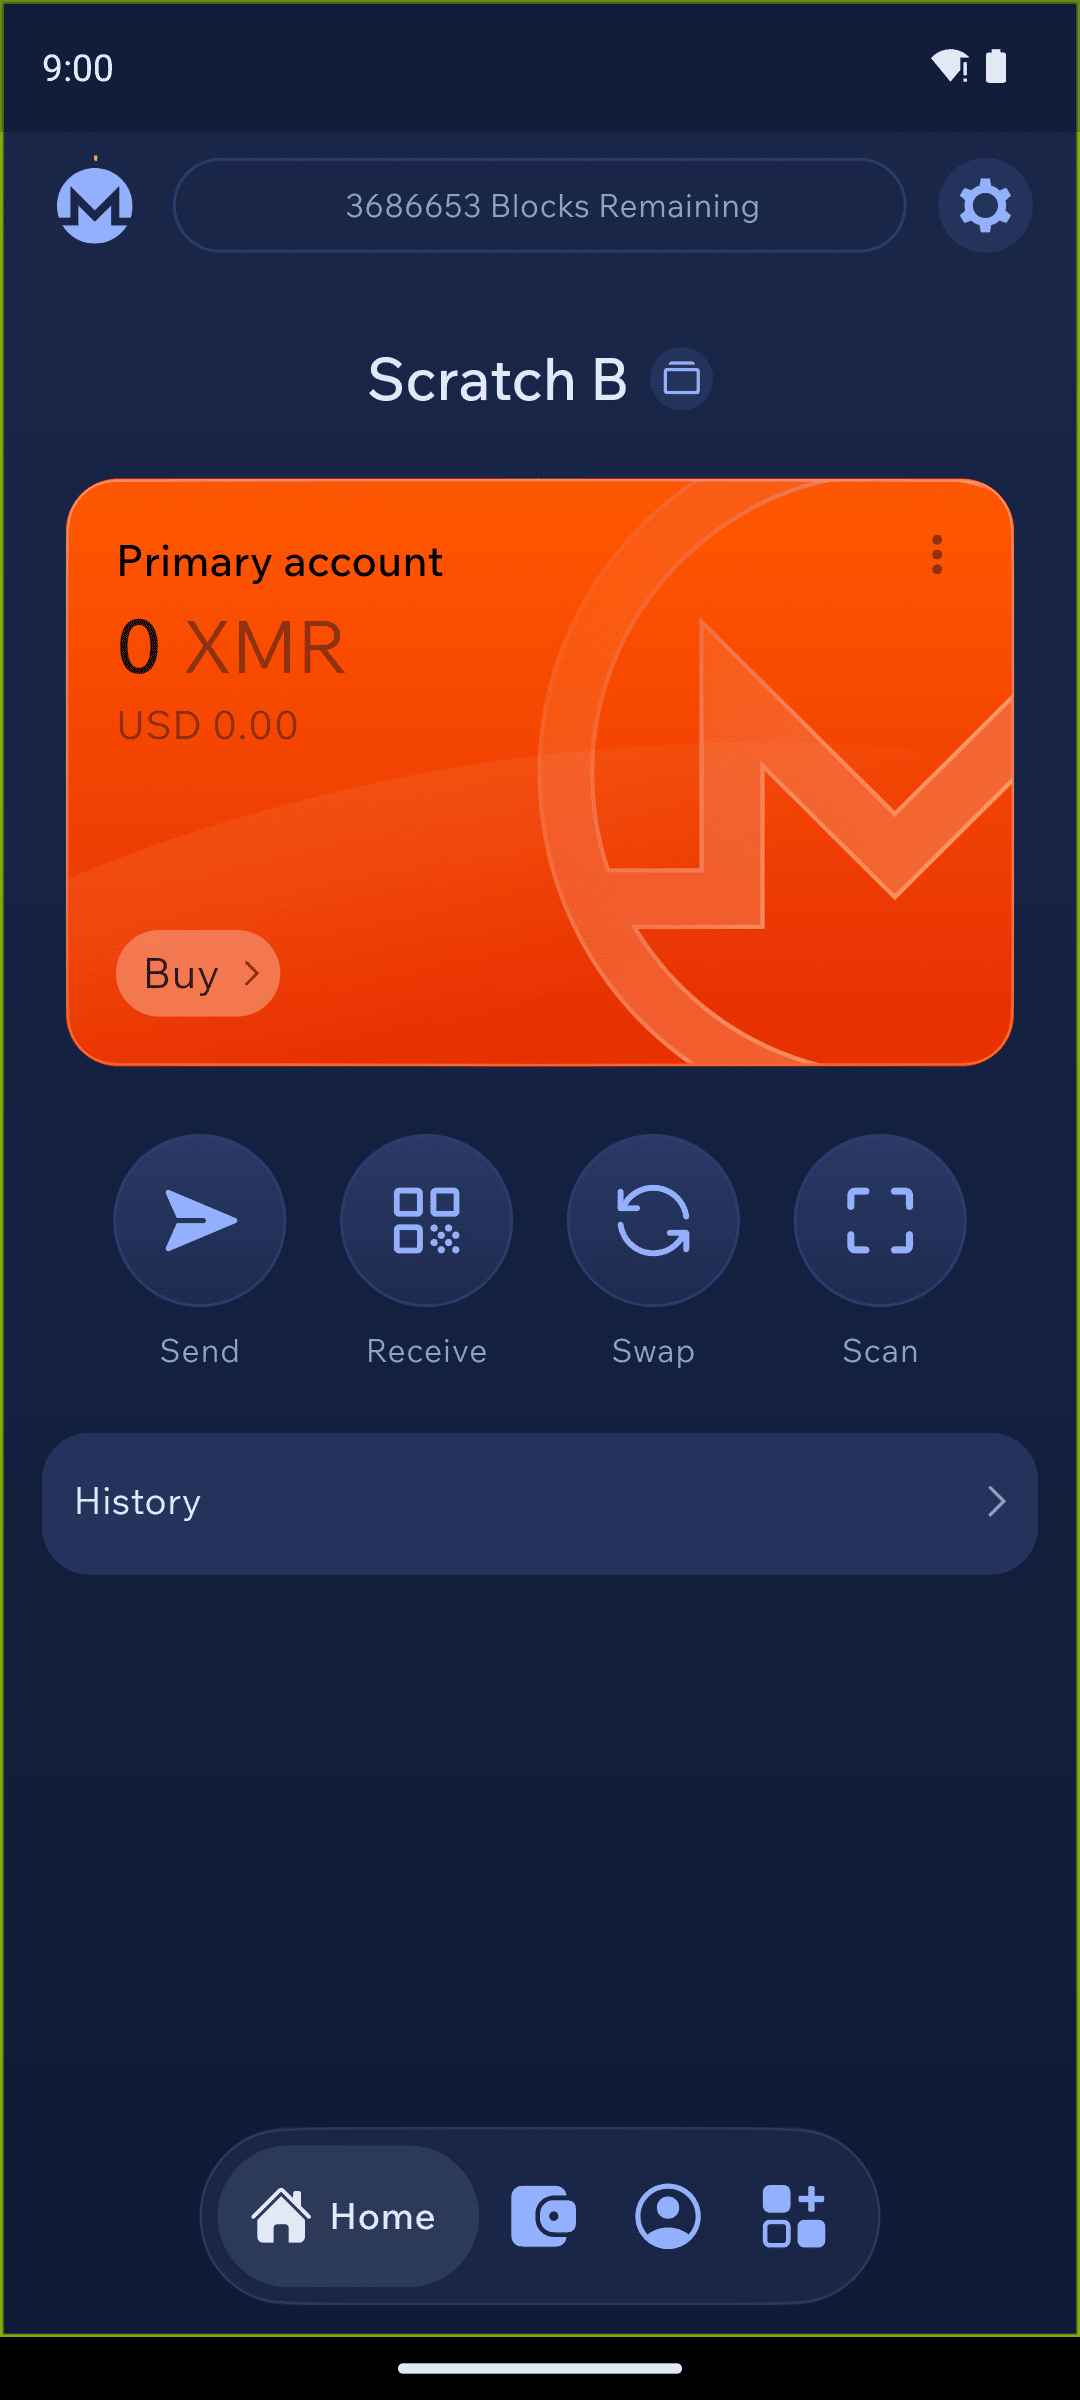
  • Once restored, you will see a synchronization status bar at the top of the balance screen as Cake Wallet checks the Monero blockchain for your wallet history and balance

Synchronization status bar
  • When Cake Wallet finishes the synchronization process and the top bar says SYNCHRONIZED, you will see your full balance and transaction history

Using Cake Wallet

Cake Wallet is the user-friendly, multi-asset cryptocurrency wallet that prioritizes financial privacy and autonomy. With seamless swaps, strong privacy tools, and a focus on accessibility, Cake Wallet empowers you to manage, swap, and spend your digital assets securely and confidently. Cake Wallet is also 100% open-source, ensuring that every bit of code is able to be verified and independently reviewed, keeping your crypto safer than ever from attacks or mistakes.

Cake Wallet also enables you to easily swap between cryptocurrencies without leaving the app, buy and sell directly from fiat, and even use your crypto to buy every day items and treat yourself with Cake Pay. It's your freedom money, and Cake helps free you up to use it in more ways than ever.

Last updated